
A Crochet Button Butterfly Pattern is one of the sweetest small crochet projects you can make. Combining simple crochet stitches with a decorative button creates an adorable butterfly that can be used in countless ways. Whether you’re decorating hats, baby blankets, bags, headbands, greeting cards, or spring home décor, these tiny butterflies add a delightful handmade touch.
This beginner-friendly project works up in just a few minutes and requires only a small amount of yarn, making it perfect for using leftover yarn from larger projects. You can make them in soft pastel colors, vibrant rainbow shades, or elegant neutral tones to match any style.
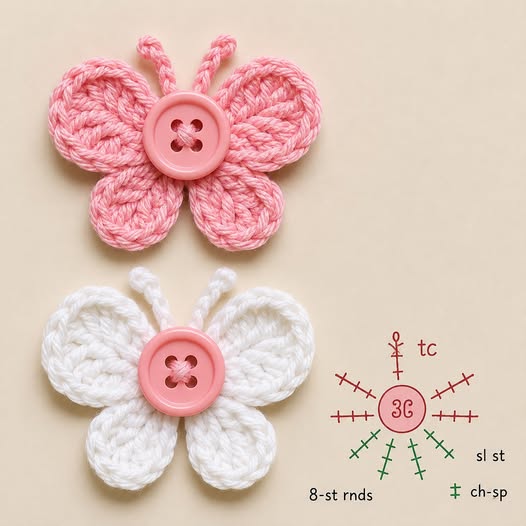
The butterfly shown features four rounded wings crocheted around a small center, finished with a button and simple crocheted antennae. Although tiny, it has beautiful texture and dimension that makes it stand out.
Why You’ll Love This Pattern
This crochet butterfly is beginner-friendly, uses very little yarn, works up quickly, and is an excellent stash-busting project. It makes beautiful embellishments for clothing, accessories, home décor, and handmade gifts, while also offering endless possibilities for customization with different yarn colors and decorative buttons.
Materials You’ll Need
- Worsted Weight (#4) cotton or acrylic yarn
- 3.5 mm (E) or 4 mm (G) crochet hook
- One decorative button (18–22 mm)
- Yarn needle
- Scissors
- Sewing needle
- Matching sewing thread
Optional Materials
- Fabric glue
- Hair clip
- Brooch pin
- Magnet
- Keychain ring
Crochet Abbreviations (US Terms)
- ch – chain
- sl st – slip stitch
- sc – single crochet
- hdc – half double crochet
- dc – double crochet
- tr (tc) – treble crochet
- st – stitch
- sp – space
Finished Size
The finished butterfly measures approximately 3–4 inches (7.5–10 cm) wide and about 2½–3 inches (6–8 cm) tall. The exact size will vary depending on your yarn choice, hook size, and personal crochet tension.
Before You Begin
This butterfly is crocheted in one continuous piece. You will begin by creating a small center ring, then work four wings around the ring before adding the antennae. Finally, a decorative button is sewn in the center to complete the butterfly.
Step-by-Step Instructions
Step 1 – Create the Center Ring
Chain 4 and join with a slip stitch to form a ring. If you prefer, you may substitute a Magic Ring for a tighter center.
Step 2 – Crochet the First Upper Wing
Into the center ring work:
- Chain 3
- 3 Treble Crochet
- Chain 3
- Slip Stitch into the ring
This creates the first upper wing.
Step 3 – Crochet the First Lower Wing
Into the same ring work:
- Chain 2
- 3 Double Crochet
- Chain 2
- Slip Stitch into the ring
This forms the smaller lower wing.
Step 4 – Repeat on the Opposite Side
Repeat the exact same sequence to create the remaining two wings.
Upper Wing:
- Chain 3
- 3 Treble Crochet
- Chain 3
- Slip Stitch
Lower Wing:
- Chain 2
- 3 Double Crochet
- Chain 2
- Slip Stitch
You should now have four evenly spaced butterfly wings.
Step 5 – Finish the Center
Fasten off the yarn, leaving a small tail. Pull the tail gently to tighten the center ring, weave in the ends securely, and trim any excess yarn.
Step 6 – Make the Antennae
Attach yarn to the top center of the butterfly.
For each antenna:
- Chain 8
- Slip Stitch back along each chain
Repeat once more to create the second antenna. Lightly curl the tips with your fingers for a natural look.
Step 7 – Attach the Button
Center the decorative button over the middle of the butterfly.
Using matching sewing thread:
- Sew through each button hole several times.
- Secure the thread on the back.
- Hide the thread ends neatly.
The button becomes the butterfly’s body while adding a lovely decorative accent.
Color Inspiration
Pastel shades such as pink, lavender, mint green, baby blue, and cream create beautiful spring butterflies. Bright colors like coral, turquoise, yellow, orange, and purple make cheerful summer butterflies. Traditional red, white, and green work wonderfully for Christmas decorations, while soft blue, ivory, and pale yellow are perfect for baby gifts.
Recommended Yarn
This project works beautifully with cotton or acrylic yarn. Some popular choices include:
- Lily Sugar’n Cream
- Lion Brand 24/7 Cotton
- Paintbox Cotton Aran
- Stylecraft Special DK
- Red Heart Super Saver
- Hobby Lobby I Love This Cotton
Cotton yarn produces crisp stitch definition, while acrylic creates a softer, fluffier appearance.
Creative Ways to Use Your Butterfly
These adorable butterflies can be used to decorate:
- Baby blankets
- Hats
- Scarves
- Tote bags
- Pillows
- Greeting cards
- Gift wrapping
- Hair bows
- Headbands
- Magnets
- Keychains
- Nursery décor
- Wall hangings
- Spring wreaths
- Seasonal garlands
Helpful Tips
Keep your stitch tension consistent so both sides of the butterfly remain symmetrical. If the wings curl after crocheting, lightly block the finished piece. Choose a button that complements your yarn color, and sew it securely through all holes for added durability. Making several butterflies at once is a great way to use leftover yarn while creating matching embellishments for multiple projects.
Skill Level
Easy
This project is perfect for beginners who are comfortable with basic crochet stitches and want a quick project that delivers beautiful results.
Final Thoughts
The Crochet Button Butterfly Pattern is a delightful project that transforms a few simple materials into a beautiful handmade embellishment. With only basic stitches, a decorative button, and a little creativity, you can create butterflies that add charm to clothing, accessories, home décor, and gifts. Whether you make just one or an entire colorful collection, these butterflies are enjoyable to crochet, easy to personalize, and perfect for every season.