
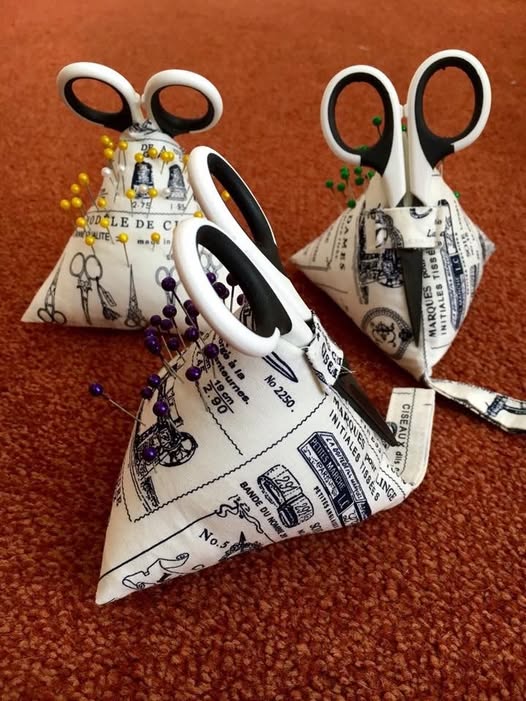
This beautiful vintage-inspired cone pincushion is a practical and charming sewing project. It can be used to hold pins, needles, and small sewing accessories, while the opening at the top can also be used to store a pair of sewing scissors.
The project is ideal for beginners and can be made with cotton fabric, vintage prints, or fabric scraps you already have at home.
Materials
You will need 1 piece of medium-weight cotton fabric measuring approximately 12 × 12 inches (30 × 30 cm), polyester fiberfill or another soft stuffing material, sewing thread, a sewing needle, fabric scissors, paper scissors, a ruler, a pencil or fabric marker, and pins or sewing clips.
A sewing machine is optional because the project can also be sewn completely by hand.
For decoration, you can use embroidery thread, small beads, buttons, lace, ribbon, or other sewing embellishments.
If you would like the pincushion to have more stability, you can also use a small amount of rice, crushed walnut shells, or poly pellets as a weight. If using rice, place it inside a small fabric pouch before putting it inside the pincushion.
Choosing the Fabric
Medium-weight cotton fabric works particularly well for this project because it is easy to sew and provides enough structure for the pincushion to maintain its shape.
Vintage sewing-themed fabrics are especially attractive, but you can use floral prints, solid colors, patchwork fabrics, or fabric scraps.
Avoid very stretchy fabrics because they can make the cone difficult to shape.
Creating the Pattern
For a medium-sized pincushion, draw an isosceles triangle on a piece of paper measuring approximately 10 inches (25 cm) high and 10 inches (25 cm) wide at the bottom.
Add a ¼-inch (6 mm) seam allowance around the edges.
Cut out the paper pattern and place it on the wrong side of your fabric. Trace the pattern twice and cut out both pieces.
The two fabric pieces should be identical.
If you want a larger or smaller pincushion, simply adjust the size of the triangle while keeping both pieces the same size.
Step 1: Prepare the Fabric
Place the two triangular fabric pieces with their right sides facing each other.
Align the edges carefully and secure them with pins or sewing clips.
If you want to add embroidery, appliqué, or other decorations, it is best to do this before assembling the pincushion.
Step 2: Sew the Pieces Together
Using a sewing machine or a needle and thread, sew along the two long sides of the triangle with a ¼-inch (6 mm) seam allowance.
Do not close the entire bottom edge.
Leave an opening of approximately 2–3 inches (5–7 cm). This opening will allow you to turn the pincushion right side out and fill it with stuffing.
Step 3: Turn the Pincushion
Carefully trim the excess fabric near the corners, making sure not to cut the stitches.
Turn the pincushion right side out through the opening.
Use a blunt tool, such as a chopstick or a turning tool, to gently push the corners into shape.
Be careful not to use anything sharp that could damage the fabric.
If necessary, lightly press the seams with an iron.
Step 4: Add the Filling
Begin filling the pincushion with polyester fiberfill.
Add small amounts of stuffing at a time, pushing the material toward the corners first.
Continue filling until the pincushion has a firm, well-defined shape.
Do not overfill it because too much stuffing can distort the shape and make it difficult to close.
For additional stability, you can place a small fabric pouch filled with rice, crushed walnut shells, or poly pellets inside the bottom of the pincushion before adding the fiberfill.
Step 5: Close the Opening
Once the pincushion is sufficiently filled, fold the raw edges of the opening toward the inside.
Close the opening by hand using a ladder stitch or small invisible stitches.
Pull the thread gently so that the stitches remain discreet.
Finish with a secure knot and hide the thread tail inside the pincushion.
Step 6: Create the Top Opening
The small opening at the top gives this pincushion its distinctive appearance and allows it to function as a scissor holder.
Reinforce the opening with several rows of stitching around the edge.
You can also sew a small piece of fabric around the opening to create a cleaner and stronger finish.
An opening approximately 1½–2 inches (4–5 cm) wide works well for many sewing scissors, but you can adjust the size according to the scissors you plan to use.
Step 7: Decorate the Pincushion
Once the basic pincushion is finished, you can personalize it with your favorite embellishments.
Small beads, buttons, embroidery, lace, ribbon, and decorative stitching can all be used to create a vintage appearance.
For a classic vintage look, consider using cream, beige, brown, mustard, burgundy, dark green, or purple details.
Make sure all beads and other small decorations are securely sewn onto the fabric.
Step 8: Add Your Sewing Scissors
Insert the handles of your sewing scissors into the opening at the top of the pincushion.
You can then place sewing pins and needles into the fabric around the cone.
This makes the pincushion both decorative and functional, keeping your most frequently used sewing tools together in one place.
Mini Version
To make a smaller pincushion, create a triangle approximately 6 inches (15 cm) high and 6 inches (15 cm) wide at the bottom.
Use the same construction method, including the ¼-inch (6 mm) seam allowance.
The smaller version is ideal for embroidery, quilting, hand sewing, travel sewing kits, or handmade gifts.
Tips for the Best Results
Use good-quality cotton fabric and strong polyester thread for greater durability.
When adding the stuffing, fill the corners first and then gradually fill the center. This will help create a cleaner cone shape.
Do not overfill the pincushion because excessive stuffing can stretch the fabric and change the shape.
Reinforce the top opening because it will receive additional pressure when scissors are inserted and removed.
If you are using decorative beads or buttons, sew them firmly so they do not come loose during use.
Project Details
This vintage cone pincushion is a beginner-to-intermediate sewing project and generally takes approximately 30–60 minutes to complete, depending on the chosen decorations and whether it is sewn by machine or by hand.
The project teaches several useful sewing techniques, including creating a simple fabric pattern, sewing seams, turning fabric, stuffing, hand stitching, and adding decorative details.
With a few fabric scraps and basic sewing supplies, you can create a beautiful handmade pincushion that is useful in any sewing room and also makes a thoughtful gift for anyone who enjoys sewing, quilting, or embroidery.