
Fabric Folded Christmas Tree Pattern is a charming sewing project that turns small pieces of festive fabric into a dimensional Christmas decoration with the cozy appearance of a miniature patchwork tree. The design shown in the inspiration photo combines layered folded fabric sections in traditional Christmas shades such as red, cream, and green.
Each section becomes progressively wider toward the bottom, creating the familiar triangular silhouette of a Christmas tree. Decorative buttons, a small hanging loop, and a star at the top complete the handmade look. It is an approachable project for anyone who enjoys Christmas sewing, fabric crafts, patchwork, and creative ways to use smaller pieces of cotton fabric.
One of the most attractive features of this Fabric Folded Christmas Tree Pattern is that the design does not depend on complicated garment construction or advanced tailoring techniques. The visual effect comes mainly from careful folding, pressing, layering, and stitching. Quilting cotton is especially suitable because it presses neatly and is available in countless holiday prints. Small floral motifs, dots, metallic accents, snowflakes, stars, and traditional Christmas prints can all work beautifully. The finished tree can be used as a hanging ornament, door decoration, handmade gift, package topper, or seasonal accent for a sewing room. By changing the size of the folded pieces, the same basic technique can produce either tiny ornaments or larger decorative trees.
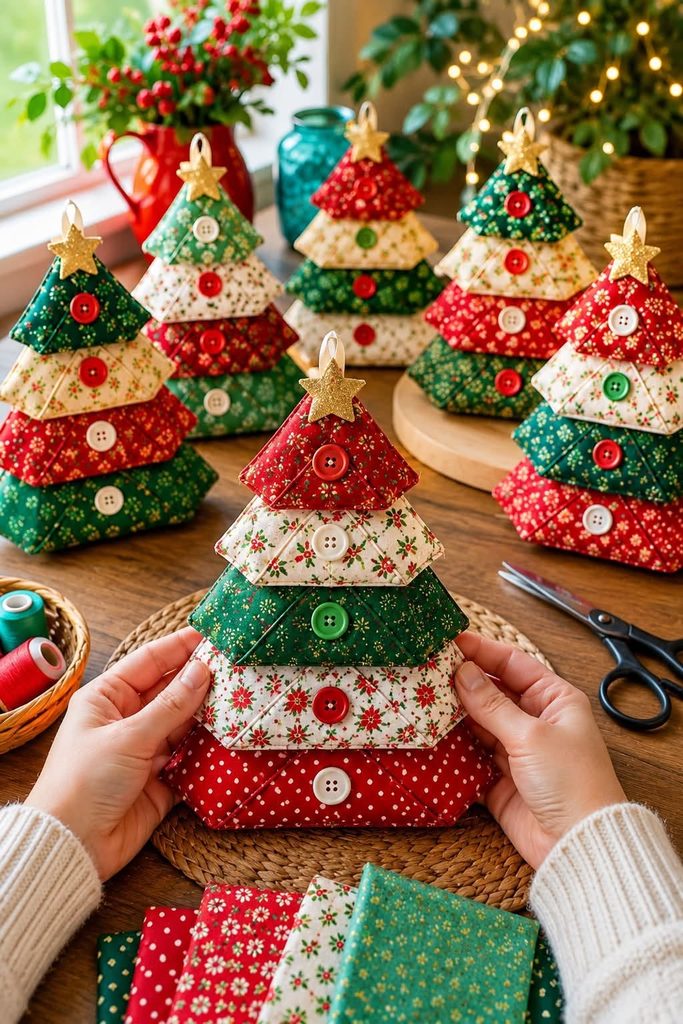
The project in the photo also demonstrates how effective repetition can be in handmade design. Instead of creating one large triangular piece, several individual folded fabric layers are arranged vertically. Their overlapping edges give the tree dimension while the contrasting colors help define each tier. Buttons positioned near the center of the sections add another decorative element and can also help secure the layers depending on the construction method chosen. This tutorial explains a practical way to recreate that appearance while allowing room for personal adjustments. Because handmade folded pieces naturally vary slightly according to fabric thickness, pressing, and seam allowance, it is helpful to make one test section before cutting an entire collection of trees.
Materials, Measurements, and Preparation for the Fabric Tree
Start by selecting 100% cotton quilting fabric or another lightweight woven fabric that holds a pressed fold well. For a traditional Christmas palette similar to the project shown, choose approximately three coordinating colors: deep green, Christmas red, and cream or white. You can use several prints within those colors rather than repeating exactly the same fabric. Scraps are ideal because each tree layer requires only a relatively small piece. Press every fabric piece before measuring so wrinkles do not affect the final proportions.
For one medium tree, prepare five rectangular pieces in gradually increasing sizes. A useful starting set is approximately 13 x 8 cm, 16 x 9 cm, 19 x 10 cm, 22 x 11 cm, and 25 x 12 cm. These measurements are flexible rather than rigid templates because the final width depends on how deeply you fold the corners. If you prefer a smaller ornament, reduce every measurement proportionally. The essential principle of the Fabric Folded Christmas Tree Pattern is that every new tier should be slightly wider than the one directly above it.
You will also need coordinating sewing thread, a hand-sewing needle, fabric scissors or a rotary cutter, a ruler, an iron, and pins or sewing clips. A sewing machine makes construction faster, although many parts can be sewn by hand. Gather five decorative buttons approximately 1.2 to 2 cm in diameter, depending on the size of your tree. Choose buttons that contrast clearly with the fabric so they become part of the decoration instead of disappearing into the printed design.
For the top, prepare a small fabric or felt star approximately 4 to 6 cm wide. Metallic gold felt works particularly well for a festive appearance, although red, cream, or patterned cotton can also be used. If you make the star from cotton, consider adding lightweight fusible interfacing so it keeps its shape. You will also need approximately 12 to 16 cm of narrow ribbon for the hanging loop. Fold the ribbon in half before attaching it so the loop extends neatly above the star.
Lightweight batting or interfacing is optional. The project shown has softly structured layers rather than completely flat fabric, so a very thin layer of batting can create a similar effect. Avoid thick batting because it can make the folds bulky and difficult to press. Lightweight fusible fleece is another possibility when a slightly fuller tree is desired. Beginners may find the project easier without batting for their first version.
Before sewing, arrange all five fabric rectangles on the table from smallest to largest. Alternate colors and prints until the combination looks balanced. For example, the top section might be red, followed by cream, green, cream, and red. Another tree could begin with green and alternate through red and neutral prints. Planning this arrangement before construction prevents two very similar fabrics from accidentally sitting beside one another and makes the finished Christmas tree sewing project look intentional.
How to Fold and Sew Each Christmas Tree Section
Begin with the smallest rectangle. Place it right side down on the ironing surface. Fold the rectangle in half horizontally with the right side of the fabric facing outward and press the fold carefully. Depending on the fabric and your preferred finishing method, the raw edges can be turned inward approximately 6 mm before pressing. Another option is to sew the rectangle right sides together, leave a small turning opening, turn it right side out, and press it into a clean rectangle before beginning the decorative folds.
To create the triangular appearance seen in the photo, bring the upper left and upper right corners diagonally toward the lower center area. The exact angle can be adjusted until the top resembles a shallow triangle or envelope flap. Press both diagonal folds firmly. The bottom corners can then be angled inward slightly, creating a neat trapezoid-like lower edge. Pin or clip the folds temporarily while checking symmetry.
Topstitch close to the folded diagonal edges if you want the visible stitched detail associated with quilted crafts. A stitch length around 2.5 to 3 mm usually works well with quilting cotton. Sew slowly across the corners because several fabric layers may overlap there. Matching thread produces a subtle result, while contrasting thread can emphasize the geometric construction of the folded fabric Christmas tree.
Repeat the process with the remaining rectangles. Each finished section should become progressively wider. Place the pieces on your work surface after folding each one rather than completing all of them independently. This allows you to compare their proportions as you work. If one tier appears too wide, deepen the diagonal folds. If it appears too narrow, reopen the folds and move them slightly outward before pressing again.
Once the folded sections have been prepared, arrange them vertically with the smallest piece at the top and the largest at the bottom. Overlap each tier approximately 1.5 to 3 cm over the section below it. The amount of overlap controls the total height of the tree. Greater overlap produces a shorter, fuller tree, while smaller overlaps produce a taller silhouette. Keep the center points aligned before securing anything permanently.
Pressing is particularly important throughout this Fabric Folded Christmas Tree Pattern. Do not drag the iron back and forth aggressively because that can distort the bias areas created by diagonal folds. Instead, lower the iron onto each fold, hold it briefly, and lift it before moving to another section. A crisp press makes the project easier to assemble and gives the finished ornament a much cleaner shape.
Assembling the Layers, Buttons, Star, and Hanging Loop
With all five sections arranged correctly, begin joining the tree from the bottom upward. Place the second-largest section over the upper portion of the largest one and pin through the hidden overlap. Stitch across the overlap where the seam will be concealed by the upper layer whenever possible. Continue adding the remaining tiers, carefully checking that the vertical center remains aligned. A ruler can help if visual alignment becomes difficult.
The layers can be joined by machine or by hand sewing. Machine stitching provides durability, particularly for decorations that will be stored and reused every Christmas. Hand stitching is useful when you want to hide nearly all construction stitches. Small whip stitches or ladder stitches can secure the layers from the back without significantly changing the appearance of the front. Whichever method you choose, avoid pulling the thread excessively because this can cause the folded sections to pucker.
Next, position one button near the center of each tier. The photo uses a playful combination of red, green, cream, and white buttons that contrast with the surrounding fabrics. Thread a hand-sewing needle with doubled thread and sew each button securely through the folded section. If children may handle the decoration, remember that buttons are small detachable components, so the ornament should be treated as decorative rather than as a toy.
Prepare the hanging loop by folding the ribbon in half and placing the two raw ends behind the top of the smallest tree tier. Stitch the ribbon securely several times. Test the loop by gently lifting the tree before covering the attachment area. The tree should hang approximately straight. If it tilts to one side, reposition the loop slightly toward the opposite side until the weight becomes balanced.
Place the Christmas star over the ribbon attachment. For a felt star, simply cut a symmetrical five-point shape and stitch around the center or edges. For a padded fabric star, cut two matching star shapes, sew them right sides together with a small opening, trim carefully around the points, turn right side out, lightly stuff or press, and close the opening. Attach the finished star securely to the upper tree section.
At this stage, inspect the entire project. Look at the spacing between the tiers, the alignment of the buttons, and the symmetry of the folded corners. Trim loose threads and press any folds that have lifted during assembly. If desired, add a few discreet hand stitches underneath the outer corners of the layers to keep them from moving during storage. Avoid excessive embellishment because the combination of folded fabric, contrasting prints, buttons, and the star already creates plenty of visual interest.
The completed tree should have a softly dimensional appearance rather than looking perfectly flat. That dimension is part of the character of the Fabric Folded Christmas Tree Pattern. When making several ornaments, small differences in folding angles and fabric combinations make every tree unique. This is especially attractive when they are displayed together because the collection feels coordinated without appearing mass-produced.
Finishing Ideas, Variations, FAQ, and Conclusion
One easy way to personalize the pattern is to experiment with Christmas fabric scraps. A traditional version can combine forest green, burgundy, cream, and gold. A modern tree might use sage green, dusty pink, ivory, and metallic details. Scandinavian-inspired decorations can be made with red and white fabrics, while a rustic farmhouse version can combine checks, tiny florals, linen-look cotton, and wooden buttons.
You can also change the number of folded sections. Three tiers create a compact ornament suitable for gift wrapping, while five tiers produce a balanced tabletop or hanging decoration similar to the project shown. Six or seven layers can create a taller tree, provided that each lower section becomes proportionally wider. Keep the increase gradual so the final silhouette remains recognizable as a tree.
For a quilted effect, place a thin piece of batting between two fabric layers before creating each folded section. Stitch diagonal lines across the pieces before folding them. This produces the subtle padded appearance associated with quilted Christmas decorations. Keep the quilting simple because dense quilting can make small folded sections stiff and difficult to manipulate.
These trees can also become thoughtful handmade gifts. Create several in coordinating fabrics and package them as a Christmas ornament set. A personalized button, embroidered initial, small fabric label, or carefully stitched year can turn a simple ornament into a keepsake. When adding personalization, keep it lightweight so it does not distort the balance of the hanging tree.
Storage is important if you want the folds to remain crisp from year to year. Place the trees flat inside a clean storage box and avoid putting heavy decorations directly on top of them. Acid-free tissue paper can be placed between ornaments when storing several together. If the folds become slightly flattened, a careful press with an iron at an appropriate temperature for the fabric can restore their shape.
Most importantly, allow the project to retain a handmade character. The Fabric Folded Christmas Tree Pattern is appealing because ordinary fabric rectangles become dimensional decorations through thoughtful folding and layering. Exact factory-like uniformity is unnecessary. Accurate cutting and pressing are useful, but small differences between trees contribute to the warmth of handmade Christmas décor.
FAQ About the Fabric Folded Christmas Tree Pattern
What is the best fabric for a Fabric Folded Christmas Tree Pattern?
Medium-light quilting cotton is one of the easiest choices because it cuts accurately, presses into crisp folds, and remains stable while sewing. It is also widely available in coordinating holiday collections. Very stretchy fabrics are less suitable because the folds can distort.
Can beginners make this folded Christmas tree?
Yes. The construction mainly uses straight stitching, folding, pressing, and basic hand sewing for the buttons. Beginners should make the first tree with quilting cotton and without thick batting. Taking extra time to press each fold usually makes a greater difference than using complicated sewing techniques.
What size should each fabric piece be?
For a medium five-tier tree, you can begin with rectangles around 13 x 8 cm, 16 x 9 cm, 19 x 10 cm, 22 x 11 cm, and 25 x 12 cm. These measurements are a practical starting point rather than mandatory dimensions. Adjust the folds until the tiers create a smooth progression from narrow to wide.
Do I need a sewing machine?
Not necessarily. A sewing machine makes the project quicker and creates consistent topstitching, but the tree can also be assembled with careful hand stitching. If sewing by hand, use small, secure stitches and strong polyester or cotton-covered polyester thread.
Can I make the tree using fabric scraps?
Absolutely. This is an excellent fabric scrap project because relatively small pieces are needed. Scraps from previous Christmas quilts, table runners, stockings, or other sewing projects can be coordinated into unique trees.
Should I use batting inside the folded sections?
Batting is optional. Thin batting gives the sections additional volume and a quilted appearance, but too much thickness can make the corners difficult to fold. For a first attempt, use fabric alone or lightweight interfacing. Once you understand the folding technique, experiment with thin batting.
How can I make the folds stay in place?
Press each fold thoroughly and secure it with pins or clips before stitching. Topstitching along the diagonal folds can also prevent them from opening. For additional security, place tiny hidden stitches at the corners after the tree has been completely assembled.
How do I keep all the tree layers centered?
Mark the center of every section with a removable fabric marker or a small crease. Align those center marks before stitching the tiers together. Work on a flat surface and periodically step back or lift the project vertically to check the overall silhouette.
Can I make a larger Fabric Folded Christmas Tree Pattern?
Yes. Increase all rectangles proportionally rather than enlarging only the bottom pieces. Larger trees may benefit from lightweight interfacing or batting to prevent the fabric from collapsing. For significantly larger decorations, additional hidden stitching between layers can provide more stability.
What decorations can replace buttons?
Small fabric appliqués, embroidery, bows, beads, tiny bells, felt circles, or decorative stitches can replace buttons. Choose embellishments that are lightweight enough for the project. If the tree will be handled frequently, securely sewn fabric or embroidery decorations are particularly practical.
How can I use the finished fabric trees?
They work well as Christmas ornaments, wall decorations, gift toppers, door decorations, handmade stocking additions, craft-fair projects, or decorative accents for holiday displays. Smaller trees can hang from branches, while larger versions can be displayed against a wall or incorporated into a festive arrangement.
Can I make several trees from the same pattern?
Yes, and making a coordinated collection is one of the strengths of this design. Keep the same basic measurements while changing fabric placement, button colors, and star materials. The consistent silhouette will connect the collection visually even when every tree uses different prints.
Conclusion
The Fabric Folded Christmas Tree Pattern transforms simple rectangles of holiday fabric into an attractive dimensional decoration through cutting, folding, pressing, layering, and basic sewing. Starting with progressively sized pieces makes it possible to build the characteristic tree silhouette without relying on a complicated template. The key is to keep the layers centered, press the diagonal folds carefully, and overlap each section consistently.
Throughout this tutorial, you learned how to select quilting cotton, prepare graduated fabric rectangles, form the folded sections, topstitch the edges, assemble the tiers, attach decorative buttons, create a ribbon hanging loop, and finish the top with a Christmas star. You also learned how batting, interfacing, alternative fabrics, and different numbers of tiers can change the finished appearance.
Once the basic construction is familiar, this pattern becomes highly customizable. Traditional reds, greens, and creams create a classic Christmas look, while contemporary prints can completely transform the style. Best of all, leftover fabric can become something decorative rather than remaining unused in the scrap basket.
If you make your own Fabric Folded Christmas Tree Pattern, experiment with different fabric combinations and embellishments to create a version that reflects your personal sewing style. Please leave your sincere opinion about this project and share any suggestions, color combinations, or creative variations you would like to try. Your ideas can inspire even more ways to turn simple folded fabric into beautiful handmade Christmas decorations.