
Crochet Christmas Star Wind Spinner Pattern is a cheerful holiday project that combines several favorite Christmas crochet elements in one decorative hanging piece: a textured star, a dimensional spiral, a small festive bell, and delicate embellishments. Inspired by the handmade ornaments shown in the reference image, this project can be worked in traditional Christmas shades or in softer colors such as pink, blue, sage green, cream, or white.
The finished decoration has plenty of movement, making it especially attractive when displayed near a window, on a covered porch, from a shelf, or as part of an indoor Christmas arrangement. Because the individual sections are worked separately before assembly, the pattern is also approachable for crocheters who want to practice shaping without committing to a very large project.
One of the most recognizable features of this crochet Christmas decoration is the spiral hanging beneath the star. The spiral is created by placing several stitches into each stitch of a foundation chain, naturally forcing the crochet fabric to curl. Instead of requiring complicated shaping, the increasing number of stitches creates the movement for you. At the top, the six-point star provides a strong visual focal point and can be decorated with a small crocheted snowflake, embroidery, beads, or another lightweight embellishment.
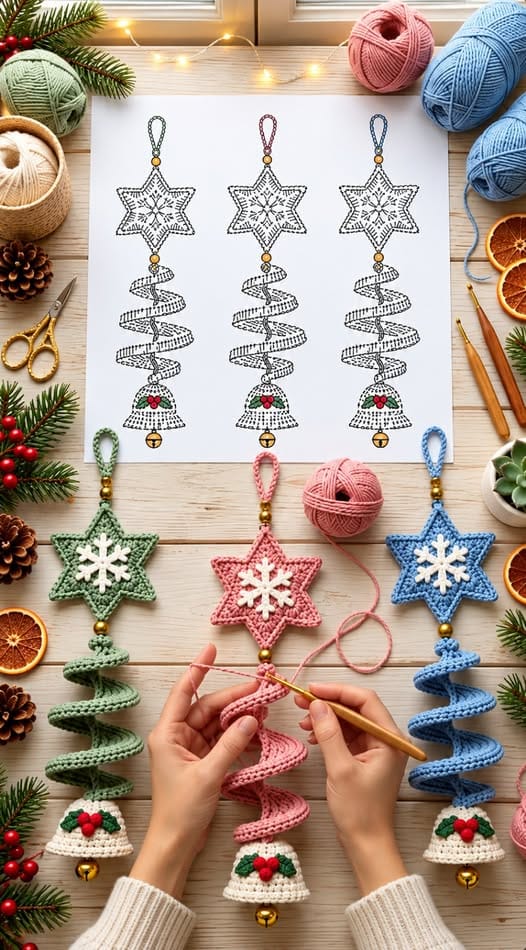
At the bottom, a miniature bell-shaped piece finishes the design and gives the ornament the charming appearance of a handmade Christmas mobile.This tutorial uses US crochet terminology and explains the main stitches so that even adventurous beginners can follow the construction. Exact size is flexible because yarn weight, hook size, and personal tension will influence the final measurements. A practical finished length is approximately 35–50 cm, although you can make your spinner shorter or longer by changing the spiral foundation chain. The most important idea behind the Crochet Christmas Star Wind Spinner Pattern is proportion: keep the star large enough to balance the spiral, make the bell slightly smaller than the star, and use lightweight decorations so the finished piece hangs naturally.
Materials, US Crochet Stitches, and Preparing the Christmas Star
For this Crochet Christmas Star Wind Spinner Pattern, choose a smooth cotton or cotton-blend yarn that provides enough structure for the star and spiral. DK or light worsted yarn works especially well. You will need a main color for the star and spinner, white or cream for the snowflake and bell, and small amounts of green and red or pink for the holly decoration. A crochet hook around 3.0–4.0 mm is a useful starting range. You may also need a yarn needle, scissors, stitch markers, optional wooden beads, and a small decorative jingle bell.
Before beginning, become familiar with the US crochet abbreviations used throughout the project. ch = chain, sl st = slip stitch, sc = single crochet, hdc = half double crochet, dc = double crochet, tr = treble crochet, st = stitch, sts = stitches, sp = space, rep = repeat, and FO = fasten off. When the instructions say MR, they refer to a magic ring. If you prefer not to use a magic ring, chain 4 and join with a slip stitch to form a small ring.
Begin the star with the main yarn color. Rnd 1: Make an MR, ch 2, and work 12 dc into the ring. Pull the ring closed and join with a sl st to the first dc. Rnd 2: Ch 1, work 2 sc into each stitch around, giving you 24 sc. Join with a sl st. This creates a compact circular center from which the six star points can be developed evenly.
For the six points, divide the 24 stitches into six groups of four stitches. Each point is shaped using progressively taller and then shorter stitches. A useful sequence is sc, hdc, dc, tr, dc, hdc, sc, working increases or chains where necessary to produce a pronounced point. Another beginner-friendly method is to create each point separately: ch 5, sl st into the second ch from hook, sc in next ch, hdc in next ch, dc in final ch, then anchor the point into the star center. Repeat evenly six times.
The star in the inspiration has a firm, almost padded appearance. To recreate that effect, crochet two identical stars. Place them with the wrong sides facing each other and join around the edges with sc. Before closing the final section, insert a very small amount of polyester stuffing. Do not overfill it; the goal is simply to give the crochet star ornament enough dimension to hold its shape. If you prefer a completely flat ornament, omit the stuffing and join the two layers directly.
Finish this section by creating the hanging loop. Attach yarn to the uppermost star point and ch 25–35, depending on the desired loop length. Sl st back into the same point and fasten off securely. You can attach a swivel clasp or metal ring between the loop and star if you want the finished decoration to rotate more freely. Weave in every loose end before continuing because doing so becomes more difficult after the spiral and embellishments have been attached.
How to Crochet the Spiral Wind Spinner
The spiral is the feature that transforms an ordinary star ornament into a Crochet Christmas Star Wind Spinner Pattern. Begin with the same color used for your star. For a medium-length spinner, ch 55–70. A shorter chain produces a compact decoration, while a longer foundation creates a dramatic hanging spiral. Remember that the finished piece will become considerably shorter than the original chain once the stitches curl.
Row 1: Starting in the second chain from the hook, work 3 sc into each chain across. You will quickly notice that the strip begins twisting on its own. Do not try to flatten it. The curling is exactly what you want. When you reach the end, gently rotate the spiral with your fingers so every coil travels in the same direction. This simple technique is the foundation of many crochet wind spinner patterns.
For a wider and more dramatic spiral, use taller stitches instead. Make the foundation chain, then work 3 dc in each chain across. Another option is to work 2 dc in one chain and 3 dc in the next, repeating across. Experimenting with stitch density changes the character of the spiral: more stitches create tighter curls, while fewer stitches create longer and more relaxed waves. For a Christmas ornament like the one pictured, a moderately tight spiral gives the most defined silhouette.
If your spiral seems too loose, gently twist it after completing the row. Because crochet stitches naturally hold their shape, the coils should settle into position. Cotton yarn can also be lightly blocked. Lay the spinner on a clean surface, arrange the curls evenly, mist very lightly with water, and allow it to dry completely. Avoid excessive stretching because you want to preserve the dimensional spiral rather than flattening it.
To attach the spinner, thread a long yarn tail through the bottom point of the star and secure the upper end of the spiral directly beneath it. A small wooden bead can be positioned between these sections, as suggested by the reference design. Besides adding visual interest, the bead helps separate the shapes so the star remains clearly visible. Sew through the connection several times so the hanging decoration can support its own weight.
The crochet spiral Christmas ornament can easily be customized. Use green for a Christmas-tree appearance, icy blue for a winter theme, pink for a playful contemporary style, or classic red for traditional holiday décor. You could even alternate colors by changing yarn along the spiral. Keep the same construction method regardless of color so that the star, spiral, and lower bell remain visually balanced.
Crocheting the Snowflake, Bell, Holly Leaves, and Assembly
A small crochet snowflake creates the decorative center of the star. With white yarn, make an MR and work 6 sc into the ring. Join with a sl st. For the next round, repeat ch 4, sl st into the second ch from the hook, ch 2, sl st into the same base area, then sl st into the next stitch. Continue around until six small branches have formed. Fasten off, leaving a tail long enough to sew the snowflake onto the center of the star.
The snowflake does not need to be large or complicated. Its purpose is to provide contrast against the colored star. Arrange it carefully in the middle and sew only through strategic points so its branches remain visible. If desired, place a tiny pearl-style bead in the center. Any bead used on a hanging decoration should be attached firmly, particularly when the ornament will be stored and reused from year to year.
Next, crochet the little bell for the bottom. Using white or cream yarn, create an MR. Rnd 1: 6 sc in MR. Rnd 2: 2 sc in each st around (12). Rnd 3: sc in next st, 2 sc in next st around (18). Rnds 4–6: sc in each stitch around. Rnd 7: 2 sc in next st, sc in next 2 sts around. This final increase creates the slightly flared lower edge characteristic of a bell.
For a decorative bell edge, work the final round as sl st in next st, 3 dc in next st, sl st in next st, repeating around as evenly as possible. The result is a gently scalloped rim. Fasten off and weave in the yarn tail. A small metal jingle bell can be securely attached underneath for decorative sound, or you can make a soft crocheted clapper using a small yarn ball if you prefer an entirely fiber-based ornament.
To create the crochet holly leaves, use green yarn and ch 6. Beginning in the second chain from the hook, work sl st, sc, hdc, sc, sl st. Work around the opposite side of the foundation chain using the same sequence. Fasten off. Make two leaves. For berries, use red, pink, or blue yarn to make three tiny bobbles or small crocheted circles. Sew the leaves and berries onto the upper front of the bell.
Assembly determines how polished your Crochet Christmas Star Wind Spinner Pattern looks. Arrange the components vertically in this order: hanging loop, star, optional bead, spiral, bell, and optional jingle bell. Use a strong strand of matching yarn to connect everything through the central axis. Hold the decoration up occasionally while assembling it. This makes it easier to see whether the star and bell face forward and whether the spiral hangs evenly.
Finishing, Customizing, Care, and FAQ for the Crochet Christmas Star Wind Spinner Pattern
Once the pieces are assembled, examine the entire Christmas crochet ornament for loose yarn ends. Weave each end through several stitches before trimming it. Pay particular attention to the hanging loop and the connections between the star, spiral, and bell. These areas carry the weight of the project, so secure stitching is more important than hiding every connection completely.
Blocking can dramatically improve the appearance of the star. Pin each star point into an even position and lightly dampen the yarn, following the care recommendations appropriate for your chosen fiber. Allow it to dry fully before hanging. The spiral generally requires much less blocking because its natural curl is part of the design. Simply arrange the coils with your hands until they look evenly spaced.
You can also adapt this crochet Christmas pattern into several sizes. For a small tree ornament, use lightweight yarn, a smaller hook, and a short spiral of approximately 30–40 chains. For a window decoration, make a larger star and begin the spiral with 70–90 chains. Rather than relying on one exact finished measurement, compare each component as you work and maintain pleasing proportions.
Color customization is one of the easiest ways to give the design a completely different personality. Sage green with cream produces a rustic Christmas look. Blue and white create a winter-inspired version, while dusty pink and white feel softer and more contemporary. Traditional crocheters may prefer deep red, forest green, and gold. Whichever palette you select, repeating the main star color in the spiral helps make the entire project feel cohesive.
The pattern can also become a thoughtful handmade gift. Create several versions using different colors for friends or family members, or coordinate them with someone’s Christmas décor. Because the Crochet Christmas Star Wind Spinner Pattern combines recognizable seasonal shapes without requiring a large quantity of yarn, it can also be a practical project for using smaller leftover skeins from other crochet projects.
For storage, avoid folding the spiral tightly. Instead, gently coil the ornament in the same direction as its natural twist and place it in a box where the star will not be crushed. When you bring it out for the next Christmas season, hold it by the top loop and gently reshape each spiral section with your fingers. Cotton and acrylic yarns usually regain their shape easily when stored carefully.
FAQ: Frequently Asked Questions
Is the Crochet Christmas Star Wind Spinner Pattern suitable for beginners?
Yes. A confident beginner who understands chain, single crochet, half double crochet, double crochet, slip stitch, and basic increases should be able to complete it. The spiral looks elaborate, but its construction is actually repetitive.
Why does the crochet strip curl into a spiral?
The spiral forms because several stitches are worked into each foundation chain. There is not enough horizontal space for all those stitches to lie flat, so the fabric naturally curls. Working three stitches into each chain produces a particularly noticeable spiral.
How long should the foundation chain be?
For a medium decoration, approximately 55–70 chains is a practical starting point. Use fewer chains for a small Christmas-tree ornament and more chains for a longer window or wall decoration.
What yarn works best for a crochet wind spinner?
Cotton and cotton blends are excellent because they provide stitch definition and structure. Acrylic can also work well, particularly when you want a softer and lighter ornament. Choose yarn that maintains the spiral without becoming excessively heavy.
Can I make the star without stuffing?
Absolutely. Crochet two flat stars and join them without filling, or make only one firm star and carefully block it. Adding a little stuffing simply gives the star the dimensional appearance seen in many handmade Christmas decorations.
How can I make the spiral tighter?
Increase the number of stitches worked into each foundation chain. For example, 3 dc in every chain creates significantly more curl than one stitch per chain. You can also manually rotate the completed strip to organize the coils.
Can the snowflake be omitted?
Yes. The star can remain plain or be decorated with embroidery, a button, a small appliqué, or another crocheted motif. The white snowflake simply reinforces the winter theme and provides strong contrast.
Can I use different colors for the star and spiral?
Yes. Although matching them creates a cohesive appearance, contrasting colors can be very attractive. For example, try a white star with a green spiral, a red star with a cream spiral, or a blue star with a silver-gray spiral.
How do I stop the star from curling?
Use a hook appropriate for your yarn and avoid overly tight tension. Making two star layers and joining them also adds stability. Light blocking afterward helps straighten the points and creates a more symmetrical shape.
Does the bottom have to include a real jingle bell?
No. The metal bell is completely optional. You can finish the project with the crocheted bell alone, add a yarn tassel, or crochet a small ball as a decorative clapper.
Can this pattern be used outdoors?
It is better suited to indoor areas or protected outdoor spaces. Regular crochet yarn can absorb moisture, fade, or collect dirt when permanently exposed to rain and direct sunlight.
What are the most important US crochet terms in this project?
The primary US crochet stitches are ch (chain), sl st (slip stitch), sc (single crochet), hdc (half double crochet), dc (double crochet), and tr (treble crochet). Knowing these basic stitches is enough to complete most of the construction described in this tutorial.
Conclusion
The Crochet Christmas Star Wind Spinner Pattern combines simple crochet techniques to create a decoration that looks much more elaborate than its individual components. You learned how to crochet and shape the six-point star, build a naturally curling crochet wind spinner, add a contrasting snowflake, make a miniature bell, crochet holly leaves and berries, and assemble everything into one balanced hanging ornament.
The most enjoyable part of this project is how easily it can be personalized. Change the yarn colors, adjust the spiral length, leave the star flat or lightly stuff it, replace the snowflake with another appliqué, or make a coordinated collection in green, pink, blue, red, and white. Once you understand how the spiral is formed, you can also experiment with different stitch heights and stitch counts to create your own variations.
This Crochet Christmas Star Wind Spinner Pattern is a lovely way to turn basic US crochet stitches into festive handmade décor with texture, movement, and personality. After making yours, leave your sincere opinion about the pattern and share any suggestions or creative variations you would add. Your ideas can inspire even more ways to personalize this charming Christmas crochet project.