
Quilting is not just about stitching fabrics together; it’s a journey of creativity and warmth.
And what better way to infuse coziness into your home decor than with a charming cat quilt pattern?
Whether you’re a seasoned quilter or just starting out, this tutorial will guide you through creating a delightful cat-themed quilt that will add a touch of whimsy to any room.
Choosing Your Fabrics
The first step in creating your cat quilt is selecting the perfect fabrics.
Opt for high-quality quilting cotton in a variety of colors and patterns to bring your feline friends to life.
Consider playful prints featuring cats, paw prints, and whimsical motifs that capture the essence of your furry companions.
Additionally, choose coordinating solids or small-scale prints for borders and sashing to complement your focal fabrics.
Once you’ve gathered your materials, prewash and press your fabrics to ensure they’re clean and free of any shrinkage.
This step is crucial for preserving the integrity of your quilt over time, ensuring that it remains as beautiful as the day you stitch it together.
Creating Your Cat Blocks
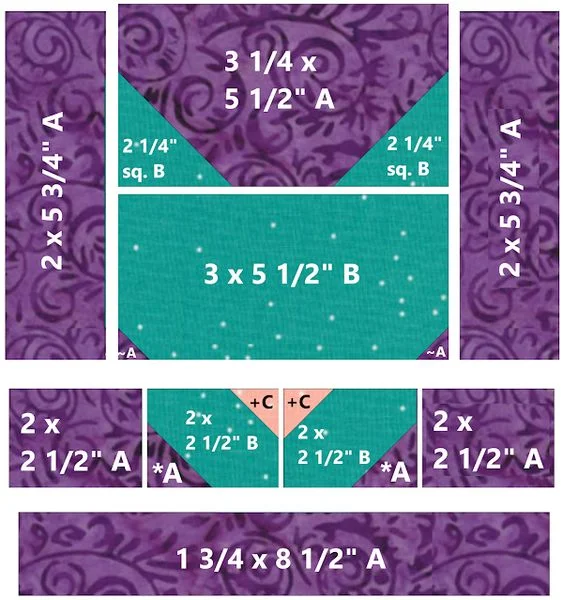
Now it’s time to bring your cat quilt to life by piecing together adorable cat blocks. Begin by cutting your fabrics into the following dimensions:
Cat
Body: 5″ x 5″ squares (choose a variety of colors/patterns for diversity)
Cat Ears: 2.5″ x 2.5″ squares (select a contrasting color for visual interest)
Cat Eyes: 1″ x 1″ squares (opt for black or a contrasting color for a striking look)
Cat Nose: 1″ x 1″ square (choose pink or another nose-like color for authenticity)
Cat Whiskers: Thin strips of black fabric, approximately 0.25″ wide
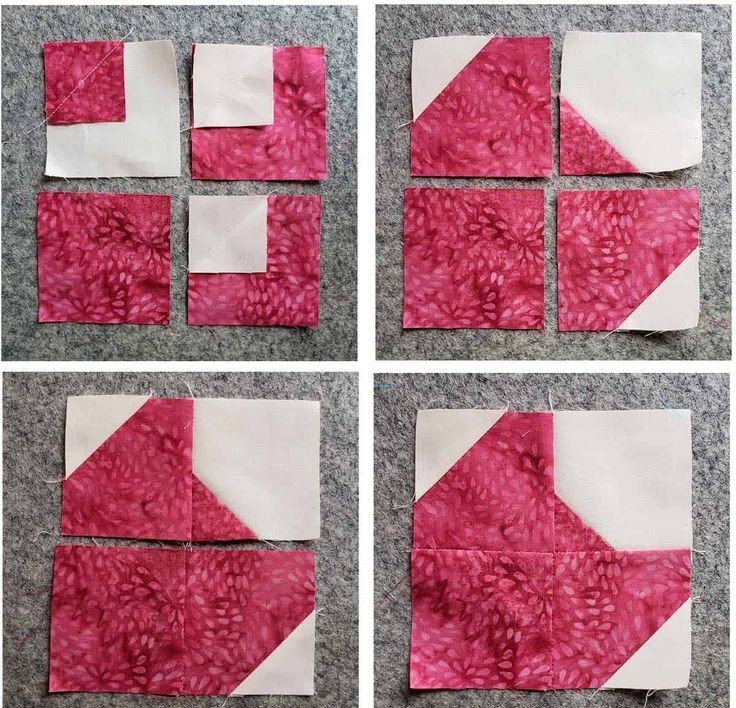
Once you’ve cut your pieces, assemble each cat block by sewing the ears, eyes, nose, and whiskers onto the body square using a quarter-inch seam allowance.
Experiment with different arrangements and facial expressions to give each cat its own unique personality.
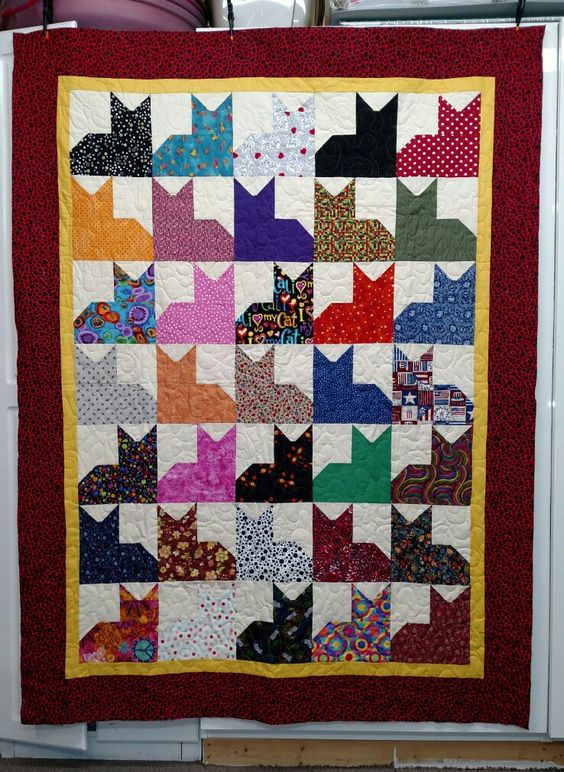
Assembling Your Quilt Top
With your cat blocks complete, it’s time to assemble your quilt top. Lay out your blocks in a visually pleasing arrangement, taking care to balance colors and patterns throughout the design.
Once you’re satisfied with the layout, sew the blocks together using a quarter-inch seam allowance, pressing your seams open to reduce bulk.
After piecing your quilt top together, add borders and sashing as desired to frame your feline friends and tie the design together.
Consider using a contrasting color or pattern to make your cat blocks pop, or opt for a subtle border to let the cats take center stage.
Quilting and Finishing Touches
Once your quilt top is complete, it’s time to quilt and add the finishing touches.
Choose a quilting design that complements your cat theme, such as meandering paw prints, swirling yarn balls, or simple straight lines to mimic fur texture.
Quilt as desired, securing the layers together with batting and backing fabric.
After quilting, trim any excess batting and backing fabric from the edges of your quilt, then bind the raw edges with a coordinating fabric to create a clean, polished finish. Finally, give your quilt a final press to smooth out any wrinkles and admire your handiwork.
Conclusion
Crafting a cat quilt pattern is not just a creative endeavor; it’s a labor of love that brings warmth and joy to any space.
Whether you’re making it as a gift for a fellow cat lover or adding a cozy touch to your own home, this tutorial will guide you through the process step by step, from selecting fabrics to adding the finishing touches.
So gather your materials, unleash your creativity, and let’s bring some feline charm into the world of quilting!