
If you love the art of quilting and are looking for a festive project, a Christmas Tree Block is a perfect choice. Whether you’re creating a full holiday quilt or simply want a few seasonal accents, this easy-to-follow tutorial will walk you through every step. We’ll also provide you with detailed fabric cuts and measurements to make your process even smoother.
In this guide, you’ll learn how to create a Christmas Tree Block that fits perfectly with your favorite quilt patterns. Using simple techniques and vibrant holiday fabrics, you can build a charming block that brings the Christmas spirit into your home. Get ready to stitch up some magic with this fun and beginner-friendly project.
Grab your fabrics, thread your machine, and let’s dive into this festive journey together. Your Christmas quilt dreams are about to come to life, one tree at a time!
Materials You’ll Need
To start your Christmas Tree Block project, you’ll need basic quilting materials. Gather a selection of green fabrics for the tree, a brown fabric for the trunk, and a background fabric—white or light-colored fabrics work best for that snowy effect. Also, make sure you have your rotary cutter, cutting mat, quilting ruler, pins, and a sewing machine ready.
If you love working with different textures, consider mixing cottons with some flannel or metallic prints. Using varied textures can give your Christmas Tree Block more dimension and uniqueness. Keep in mind that coordinating your color palette will make your finished quilt more cohesive and visually appealing.
Remember, preparation is key in all quilt patterns. Iron all your fabrics before cutting to ensure straight, precise lines. Having crisp, clean fabric will make the sewing process much easier and give you a more polished final result.
Fabric Cuts and Measurements
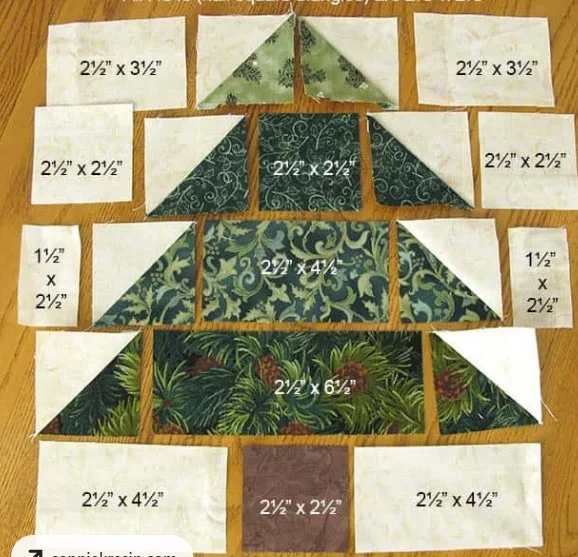
For each Christmas Tree Block, you’ll need specific cuts of fabric. Below are the dimensions:
- Tree Fabric:
- (1) 5″ x 5″ square (top of tree)
- (2) 6″ x 6″ squares (middle of tree)
- (2) 7″ x 7″ squares (bottom of tree)
- Background Fabric:
- (4) 5″ x 5″ squares
- (4) 6″ x 6″ squares
- (4) 7″ x 7″ squares
- Trunk Fabric:
- (1) 2.5″ x 3.5″ rectangle
Accurate cutting is the backbone of beautiful quilt patterns. Always double-check your measurements before making any cuts. If you’re working on multiple blocks at once, it can be helpful to group your pieces by size and fabric for easier assembly.
Having all your pieces ready before you start sewing will streamline the whole process. Plus, a neat and organized workspace will keep your focus on the joy of quilting rather than the mess!
Step-by-Step Assembly
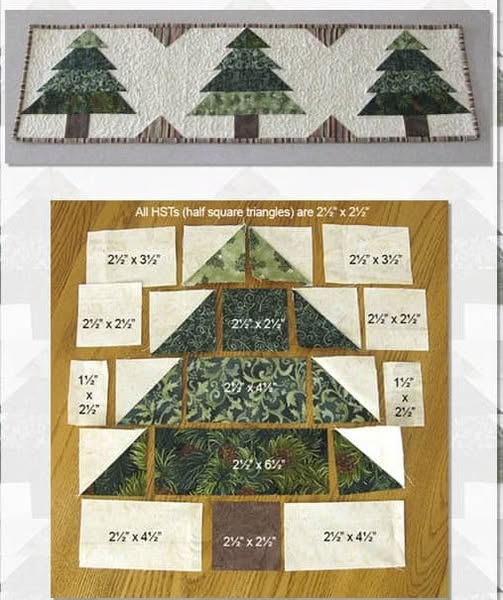
Start by creating the tree sections. Pair one green square with one background square of the same size. Place them right sides together, draw a diagonal line from corner to corner, and sew ¼” away from both sides of the line. Cut along the drawn line to create two half-square triangles (HSTs).
Press the HSTs open and trim them to the desired size if needed. Repeat this process for each size of squares you have cut. These HST units will form the layers of your Christmas tree in the block.
Once you have all your HSTs, arrange them from smallest to largest to create the classic triangular Christmas tree shape. This layered design is a timeless feature in many holiday quilt patterns and adds a festive flair to your projects.
Adding the Tree Trunk
After assembling your tree layers, it’s time to add the trunk! Center the 2.5″ x 3.5″ brown rectangle beneath the bottom of your tree. To create a uniform look, sew small strips of background fabric to each side of the trunk rectangle if needed to match the tree’s width.
Attach the trunk unit to the bottom row of the tree. Make sure everything lines up neatly to keep your block symmetrical. Precision here ensures that your finished quilt will look polished and professional.
The trunk is a small but important detail that completes the Christmas Tree Block design. Many holiday-themed quilt patterns use similar techniques to balance charm and simplicity, making them perfect for quilters of all skill levels.
Final Block Assembly
Once the tree and trunk are sewn, stitch all sections together, row by row. Carefully match seams and points to keep your tree looking sharp and balanced. Use plenty of pins to hold pieces in place before sewing.
After stitching the rows, press your seams flat. You can choose to press seams open or to one side, depending on your preference. A well-pressed quilt block makes a big difference when assembling your final quilt top.
Trim your Christmas Tree Block to the desired size, usually around 12.5″ square, but adjust according to your overall quilt patterns. Trimming ensures a uniform, professional look when combining multiple blocks into one quilt.
Tips for a Perfect Christmas Tree Block
Consistency is key when piecing together your Christmas Tree Block. Always use a ¼” seam allowance throughout the project to maintain uniform block sizes. Slight variations can add up quickly in a large quilt.
Choosing the right fabrics can elevate your project. Look for small-scale prints that won’t overwhelm your tree design. Incorporating a little sparkle or metallic thread can make your Christmas Tree Block pop among other quilt patterns.
Lastly, take your time and enjoy the process! Quilting is as much about creativity and joy as it is about the final product. Every stitch you make brings you closer to a festive masterpiece you’ll treasure year after year.
Finishing Your Quilt
Once you’ve created multiple Christmas Tree Blocks, the next step is to join them together to create a full quilt top. You can separate each block with sashing or sew them directly together for a more compact look.
Add a festive border using Christmas-themed fabrics to frame your quilt beautifully. This added touch will help your quilt stand out and match other holiday decor. Many quilt patterns include detailed instructions on how to add borders seamlessly.
Finally, layer your quilt top with batting and backing, baste it, and quilt it as desired. Simple straight-line quilting or free-motion designs like swirls and snowflakes can enhance the festive feel of your Christmas Tree Block quilt.
Conclusion
Creating a Christmas Tree Block is a delightful and achievable project for any quilter, no matter their skill level. By following this detailed tutorial, you can confidently add a festive flair to your holiday decorations through the art of quilting.
Combining these blocks into a full holiday quilt or using them as standalone pieces like pillows or wall hangings can spread Christmas cheer throughout your home. Plus, this pattern integrates beautifully with many classic and modern quilt patterns.
Ready to get started? Gather your holiday fabrics and dive into this joyful project. Your handmade Christmas Tree Block will become a treasured part of your holiday traditions for years to come!