
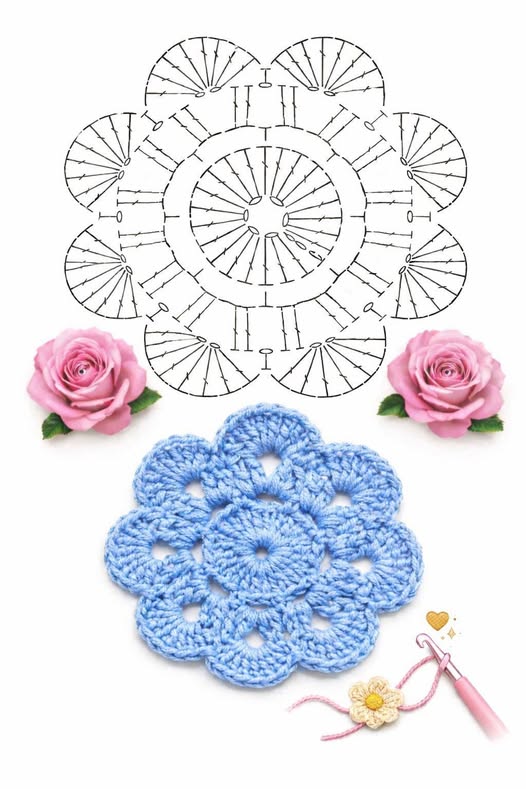
Crochet flowers are one of the most beautiful and versatile motifs you can create. They are perfect for decorating clothes, accessories, home décor, or even combining into larger projects like blankets and table runners. This specific flower pattern features a rounded center with soft, petal-shaped edges that give it a delicate and elegant look.
This tutorial will guide you through the entire process, from the materials you need to each step required to recreate this lovely crochet flower. The design is beginner-friendly but also enjoyable for more experienced crocheters.
By the end of this guide, you will have a finished crochet flower that looks just like the one in the image—and you can easily customize it to suit your style.
Materials Needed
To create your crochet flower, gather the following materials. Choosing the right supplies will make your work easier and improve the final result.
You will need lightweight or medium-weight yarn (such as cotton or acrylic). Cotton yarn is highly recommended because it provides excellent stitch definition and helps the flower keep its shape. Soft pastel colors, like the blue shown in the image, highlight the texture beautifully.
Use a crochet hook between 2.5 mm and 3.5 mm, depending on your yarn thickness. A smaller hook will create tighter stitches and a more defined flower.
You will also need scissors to cut the yarn and a yarn needle to weave in the ends. Optional tools include stitch markers and blocking pins if you want to shape your flower after finishing.
Abbreviations and Basic Stitches
Understanding basic crochet terms will help you follow the pattern more easily. Here are the abbreviations used in this tutorial.
ch = chain
sl st = slip stitch
sc = single crochet
hdc = half double crochet
dc = double crochet
tr = treble crochet
st = stitch
These stitches form the foundation of the flower. If you are a beginner, it’s helpful to practice them before starting.
Step 1: Creating the Center Ring
Begin with a magic ring, or chain 4 and join with a slip stitch to form a loop.
Round 1: Chain 2 (counts as first stitch), then work 11 double crochets into the ring. You should have 12 stitches total.
Join with a slip stitch to the top of the first chain. Tighten the ring if using a magic ring. This creates the base circle of your flower.
Step 2: Building the Inner Round
Round 2: Chain 2, then work 2 double crochets in each stitch around (increase in every stitch). This will give you 24 stitches.
Join with a slip stitch. This round expands the center and prepares the space for the petals.
Make sure your stitches are evenly spaced to keep the circle flat.
Step 3: Forming the Petals
Now comes the most beautiful part—creating the flower petals.
Start by chaining 1. In the same stitch, work the following:
1 single crochet, 1 half double crochet, 3 double crochets, 1 half double crochet, 1 single crochet.
This full sequence creates one petal.
Skip the next stitch, then repeat the petal sequence in the following stitch. Continue this pattern around.
You should end up with 8 evenly spaced petals forming a round flower shape.
Join with a slip stitch at the end.
Step 4: Enhancing the Petal Shape
To give the petals more definition, you can add an extra round.
Slip stitch into the first stitch of a petal. Chain 1, then work single crochets evenly across the petal stitches.
At the tip of each petal, you can add a picot (chain 2 or 3, then slip stitch into the same stitch) to create a decorative point.
Repeat this for each petal around the flower.
This step is optional but adds a delicate and professional finish.
Step 5: Finishing the Flower
Once all petals are complete, fasten off your yarn and cut, leaving a small tail.
Use a yarn needle to carefully weave in all loose ends on the back of the flower. Make sure the ends are secure and not visible from the front.
If needed, gently shape the petals with your fingers.
Blocking and Final Touches
Blocking your crochet flower can significantly improve its appearance. Lightly dampen the piece and pin it flat on a surface, shaping each petal evenly.
Allow it to dry completely before removing the pins. This helps the flower maintain its structure and enhances the stitch definition.
Blocking is especially useful if your petals curl or look uneven.
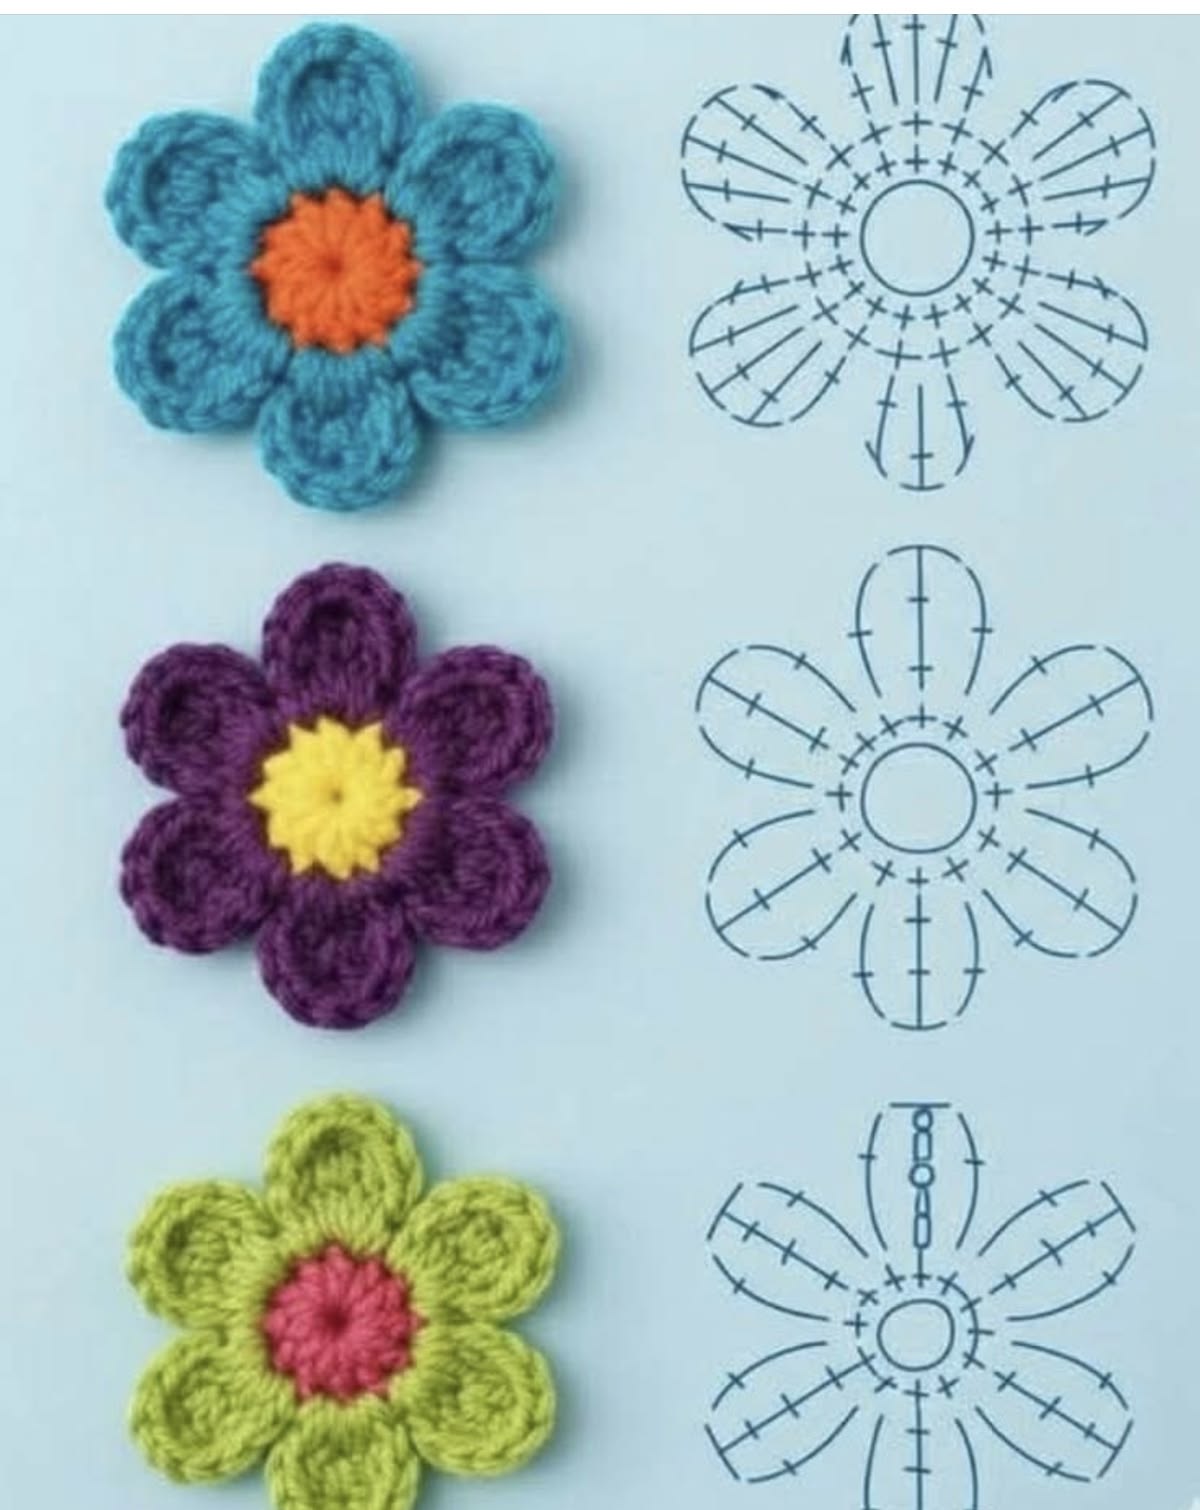
Creative Uses and Customization Ideas
This crochet flower pattern is extremely versatile. You can use it in many creative ways.
Attach it to headbands, hats, or bags for a decorative touch. Sew multiple flowers together to create a scarf, blanket, or table centerpiece.
Experiment with different yarn colors, including multicolor or gradient yarns, to give each flower a unique look.
You can also adjust the size by using thicker yarn and a larger hook, or make smaller flowers with finer yarn.
Conclusion
This crochet flower pattern is simple, elegant, and perfect for all skill levels. With just a few basic stitches and some creativity, you can create beautiful floral motifs for a variety of projects.
Whether you’re crafting for fun, gifts, or to sell, this pattern is a wonderful addition to your crochet collection.
Now that you have the full step-by-step guide, gather your materials and start making your own crochet flowers today.
PATTERN HERE
CROCHET PATTERNS
FULL PATTERN ACCESS
You will be redirected to another site