
The Easy Rodeo Roundup Quilt Pattern is a charming western-inspired quilt featuring cowboy boots, rustic fabrics, and a cozy rag-quilt finish. This project combines appliqué, quilting, and simple construction techniques to create a unique wall hanging or decorative quilt perfect for country décor. The original Missouri Star design finishes at approximately 36″ x 45″ and uses denim, flannel, and appliqué boot motifs.
Materials Needed
Fabrics
- 24 denim squares, 10″ x 10″
- 42 flannel squares, 10″ x 10″
- Assorted cotton prints for boot appliqués
- Fabric scraps for decorative details
- Fusible adhesive web
Sewing Supplies
- Sewing machine
- Coordinating thread
- Invisible thread (optional)
- Fabric scissors
- Rotary cutter and mat
- Quilting ruler
- Iron and ironing board
- Rag quilt snips
- Embroidery floss (optional)
Optional Embellishments
- Embroidery designs
- Decorative stitching
- Beads
- Thread painting accents
The original pattern uses denim and flannel fabrics combined with the Missouri Star Hats & Boots template set.
Step 1 – Prepare the Boot Templates
Create or trace cowboy boot shapes onto template material.
You will need:
- Boot shaft
- Foot section
- Heel
- Pull tab
Cut out each template carefully. These pieces will be used repeatedly throughout the project.
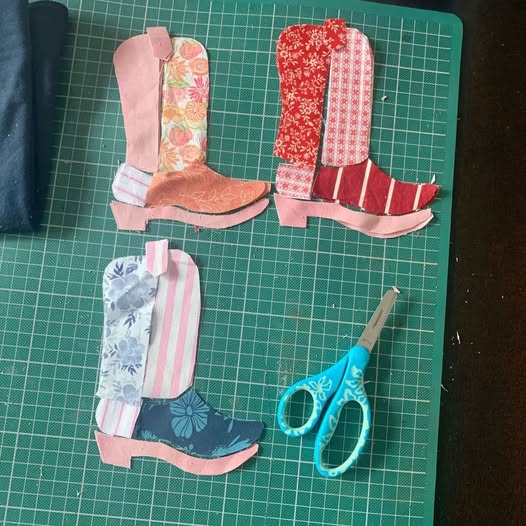
Step 2 – Cut the Appliqué Fabrics
Select several coordinating western-style fabrics.
Cut:
- Boot shafts
- Boot feet
- Heels
- Pull tabs
Mix florals, stripes, plaids, denim, and rustic prints for a true rodeo look.
Press all pieces before assembly.
Step 3 – Apply Fusible Web
Attach fusible adhesive to the wrong side of each appliqué fabric.
- Follow manufacturer instructions.
- Press firmly.
- Allow fabric to cool.
- Remove backing paper.
This step keeps the appliqué pieces secure during sewing.
Step 4 – Assemble the Cowboy Boots
Arrange the boot components on a background square.
Layer:
- Shaft
- Foot
- Heel
- Pull tab
Experiment with color combinations until each boot has its own personality.
Once satisfied, fuse the pieces into place.
Step 5 – Stitch Around the Appliqué
Using a zigzag, blanket stitch, or decorative stitch:
- Sew around all appliqué edges.
- Work slowly around curves.
- Secure corners carefully.
This creates durability and gives the boots a professional finish.
Step 6 – Add Decorative Details
Enhance each boot with western-inspired embellishments.
Ideas include:
- Embroidered flowers
- Decorative swirls
- Stars
- Horseshoes
- Initials
- Contrast stitching
These details help each block become unique.
Step 7 – Prepare the Rag Quilt Layers
For every quilt block:
- Place a backing square wrong side up.
- Add a front square wrong side down.
- Position the decorated boot block on top.
Align all edges carefully.
Pin each layer together.
Step 8 – Quilt Each Block
Sew through all layers.
Options include:
- Straight-line quilting
- Crosshatch quilting
- Free-motion quilting
- Decorative western motifs
Keep stitching simple so the appliqué remains the focal point.
Step 9 – Arrange the Quilt Layout
Lay all completed blocks on a flat surface.
Move them around until you achieve a balanced arrangement.
Alternate:
- Dark and light fabrics
- Floral and striped prints
- Denim and flannel textures
Take a photo before sewing the rows together.
Step 10 – Sew the Rows
Join blocks into rows.
Because this is a rag quilt:
- Place backing sides together.
- Sew with exposed seam allowances.
Continue until each row is complete.
Step 11 – Join the Rows Together
Sew the completed rows together.
Match seams carefully.
Press gently after each row is attached.
The exposed seams will create the signature rag-quilt texture.
Step 12 – Finish the Outer Edges
Sew around the perimeter of the quilt.
Use the same seam allowance used throughout the project.
Double-stitch corners for extra durability.
Step 13 – Clip the Rag Seams
Using rag quilt snips:
- Clip every seam allowance.
- Cut at regular intervals.
- Avoid cutting through stitching.
This step allows the fabric to fray beautifully after washing.
Step 14 – Wash and Dry
Machine wash the quilt.
Then tumble dry on low heat.
The exposed seam allowances will soften and fluff, creating the classic rag-quilt appearance.
Repeat washing if additional texture is desired.
Finished Quilt
Your Easy Rodeo Roundup Quilt is now complete.
Features include:
- Western cowboy boot appliqués
- Soft rag-quilt texture
- Denim and flannel combination
- Beginner-friendly construction
- Endless opportunities for customization
The finished quilt measures approximately 36″ x 45″, making it perfect as a wall hanging, nursery quilt, lap quilt, or western home décor accent.
Tips for Success
- Use contrasting fabrics for the boots.
- Press after every major step.
- Keep appliqué edges smooth.
- Clip rag seams thoroughly.
- Add embroidery for extra character.
- Mix florals and denim for a classic western look.
The result is a fun, rustic quilt that captures the spirit of the rodeo while remaining easy enough for confident beginners to complete.