Making clothes for your dog is a fun and rewarding sewing project. A comfortable raglan-style shirt is perfect for keeping your furry friend warm during cooler days while allowing freedom of movement. This simple design works well for beginners and can be customized with different fabrics, colors, and prints to match your pet’s personality.
The raglan sleeve design is especially popular because it creates a comfortable fit around the shoulders and chest. Unlike traditional sleeves, raglan sleeves extend to the neckline, making the garment easier to sew and more comfortable for active dogs. Whether you are sewing for a small puppy or an adult dog, this pattern can be adjusted to fit various sizes.
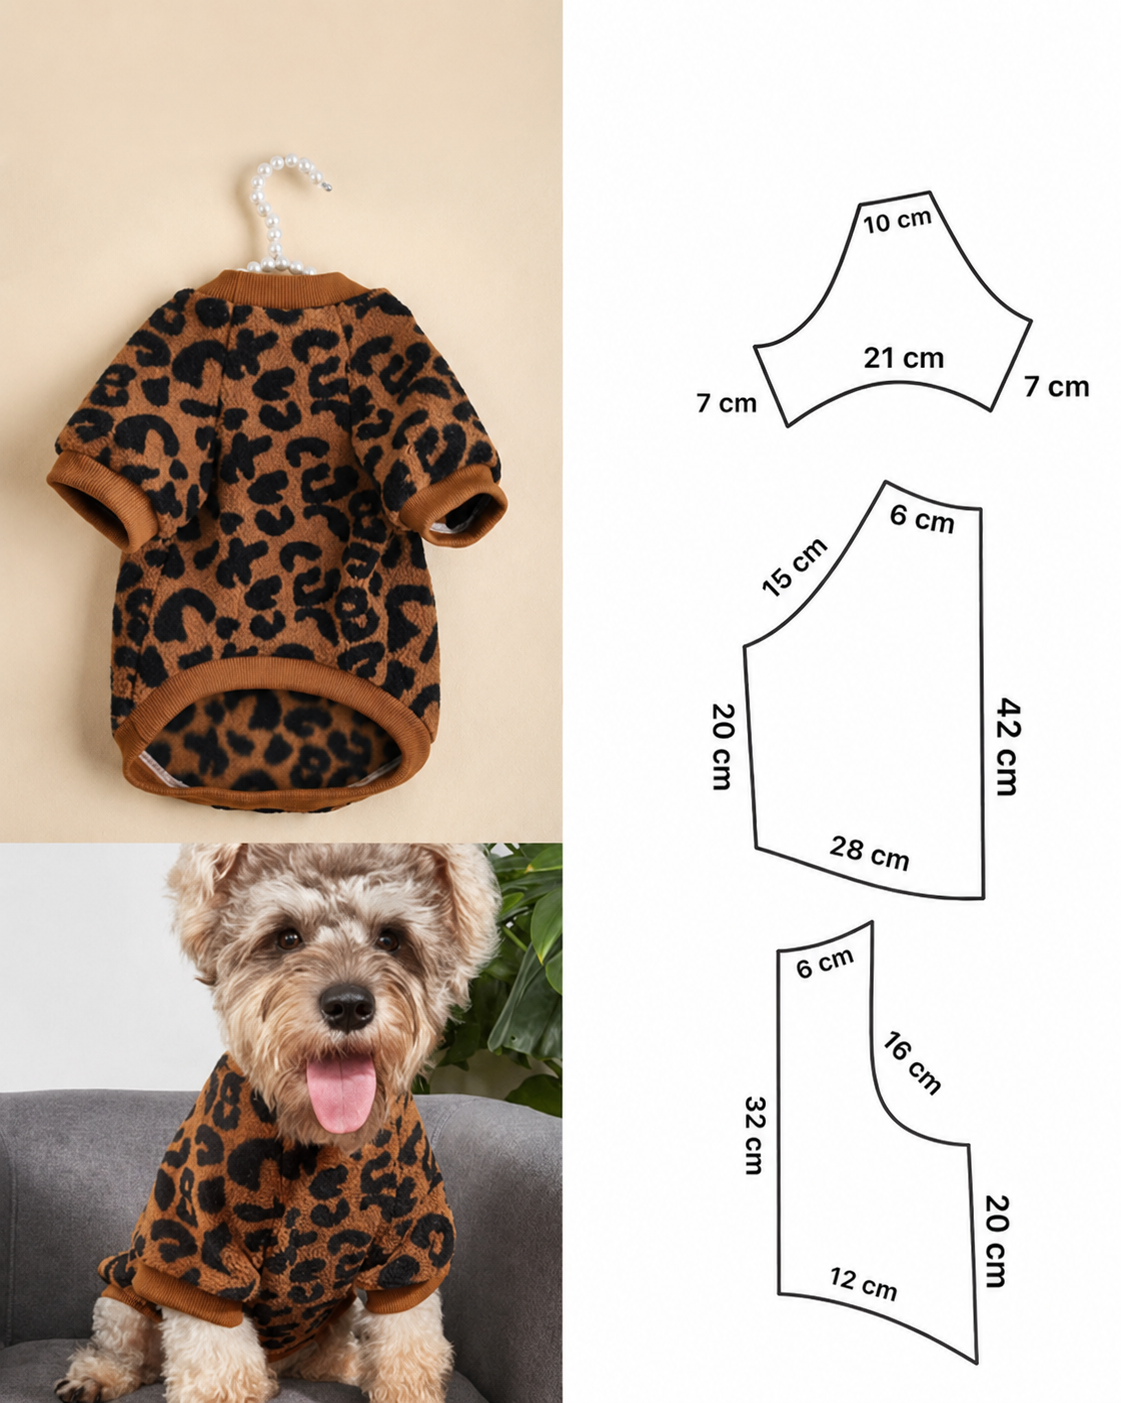
In this tutorial, you will learn how to create a stylish dog raglan shirt using the measurements shown in the pattern. Gather your materials, prepare your fabric, and let’s get started.
Materials Needed
Before beginning, gather the following supplies:
- Soft fleece, sweatshirt fabric, or knit fabric
- Rib knit fabric for cuffs, neckline, and hem
- Sewing machine
- Matching thread
- Fabric scissors
- Measuring tape
- Fabric clips or pins
- Tailor’s chalk or fabric marker
- Printed pattern pieces
- Iron and ironing board
Pattern Pieces
The shirt consists of three main pieces:
Front Piece
- Length: 32 cm
- Neck width: 6 cm
- Bottom width: 12 cm
- Chest opening: 20 cm
- Raglan seam: 16 cm
Back Piece
- Length: 42 cm
- Neck width: 6 cm
- Bottom width: 28 cm
- Side height: 20 cm
- Raglan seam: 15 cm
Sleeve Piece
- Top width: 10 cm
- Bottom sides: 7 cm
- Sleeve opening: 21 cm
Transfer all measurements onto pattern paper and cut out each piece carefully.
Preparing the Fabric
Wash and dry the fabric before cutting to prevent future shrinkage. Press the fabric with an iron to remove wrinkles and create a smooth cutting surface.
Fold the fabric with right sides together. Place the pattern pieces onto the fabric according to the grain direction. Pin or clip the patterns securely before cutting.
Cut:
- 1 Front piece on fold
- 1 Back piece on fold
- 2 Sleeve pieces
- Ribbing strips for neckline, cuffs, and hem
Mark any important matching points using tailor’s chalk.

Sewing the Raglan Sleeves
Place one sleeve right sides together with the front piece. Align the raglan seams and sew using a stretch stitch or narrow zigzag stitch.
Repeat for the second sleeve.
Next, attach the back piece to the remaining sleeve edges. Sew each raglan seam carefully and press the seams flat.
At this stage, the garment should begin to resemble a shirt shape.
Sewing the Side Seams
Fold the shirt right sides together.
Align the sleeve underarm seams and side seams. Pin the edges together and sew continuously from the sleeve cuff area down to the bottom hem.
Repeat on the opposite side.
Press the seams open or toward the back.
Adding the Neckband
Measure the neckline opening.
Cut a rib knit strip slightly shorter than the neckline circumference. Join the short ends to form a loop.
Fold the loop in half lengthwise with wrong sides together.
Divide both the neckline and neckband into four equal sections and match the marks.
Pin the neckband to the neckline, stretching the ribbing evenly as you sew.
Press the finished neckline for a professional appearance.
Attaching the Sleeve Cuffs
Measure the sleeve openings.
Cut rib knit cuffs approximately 70% to 80% of the sleeve opening circumference.
Sew the cuff ends together to create loops.
Fold each loop in half and attach to the sleeve openings, stretching evenly during sewing.
This creates a snug and comfortable fit around the dog’s legs.
Finishing the Bottom Hem
Cut a rib knit band to fit the bottom edge of the shirt.
Join the ends to create a loop.
Fold the band in half and sew it to the bottom hem, stretching gently as you sew.
The ribbed hem gives the garment a polished look and helps keep the shirt in place while the dog moves.
Final Pressing and Inspection
Trim any loose threads.
Press all seams lightly with an iron suitable for your fabric type.
Check that all seams are secure and that the neckline, cuffs, and hem lie flat.
Try the shirt on your dog and make any small adjustments if necessary.
Customization Ideas
One of the best things about sewing dog clothes is the ability to personalize them.
Some fun ideas include:
- Animal print fabrics
- Sports-themed fabrics
- Holiday patterns
- Personalized embroidered names
- Decorative patches
- Contrasting sleeve colors
- Matching owner-and-pet outfits
These simple additions can make each shirt unique and special.
Conclusion
This Dog Raglan Shirt Pattern is an excellent sewing project for pet lovers. The raglan construction provides comfort, flexibility, and a professional appearance while remaining easy enough for beginners to complete. With soft fabric and a little creativity, you can create a cozy shirt that your dog will enjoy wearing throughout the year.
Experiment with different fabrics and colors to build an entire wardrobe for your furry companion. Once you make one, you’ll likely want to sew several more in different styles and prints.