
If you’re looking for an easy sewing project that is practical, stylish, and beginner-friendly, this knot shoulder bag is a great place to start.
You only need basic sewing skills and a standard sewing machine to make this simple fabric bag. The finished design has a long shoulder strap that can be tied into a knot, giving the bag a unique and handmade look.
In this tutorial, you’ll learn how to cut the fabric, sew the bag body, attach the rounded bottom, make the strap, and finish the bag neatly.
The best part? You don’t need an expensive sewing machine to make it.
What You’ll Learn in This Tutorial
By the end of this project, you’ll know how to:
- Cut a simple bag pattern
- Sew straight seams
- Sew curved seams
- Attach a rounded bag bottom
- Make a fabric shoulder strap
- Reinforce a bag handle
- Finish raw fabric edges
- Create a simple knot detail
- Use a sewing machine for a practical beginner project
This project is also a great way to practice before moving on to more advanced sewing projects.
What Sewing Machine Do You Need?
You don’t need a professional sewing machine for this project.
A basic sewing machine for beginners is enough, as long as it can sew a reliable straight stitch.
Ideally, your machine should have:
- Straight stitch
- Zigzag stitch
- Adjustable stitch length
- Reverse stitching
- Easy threading
- Adjustable presser-foot pressure, if available
- A free arm
- Good speed control
A computerized sewing machine can make the project even easier because features such as speed control and automatic needle positioning can be helpful for beginners.
However, a simple mechanical sewing machine can also handle this project very well.
What About a Heavy-Duty Sewing Machine?
You don’t need a heavy-duty machine if you’re making this bag from lightweight or medium-weight cotton fabric.
If you plan to use canvas, denim, upholstery fabric, or several layers of thick material, however, a stronger machine may be a better choice.
For a beginner making a basic cotton shoulder bag, focus on ease of use rather than maximum power.
Materials You’ll Need
Before you start, gather all your supplies.
Fabric
You’ll need enough fabric for:
- 2 bag-body pieces
- 1 bottom piece
- 1 long shoulder strap
Cotton, linen, or lightweight canvas are good choices.
For your first bag, avoid very slippery or stretchy fabrics because they can be more difficult to control.
Sewing Supplies
You’ll also need:
- Sewing machine
- Matching thread
- Fabric scissors
- Measuring tape
- Fabric marker or chalk
- Sewing pins or clips
- Iron
- Ironing board
- Ruler
- Seam ripper
- Sewing machine needle suitable for your fabric
Interfacing is optional if you want the finished bag to have more structure.
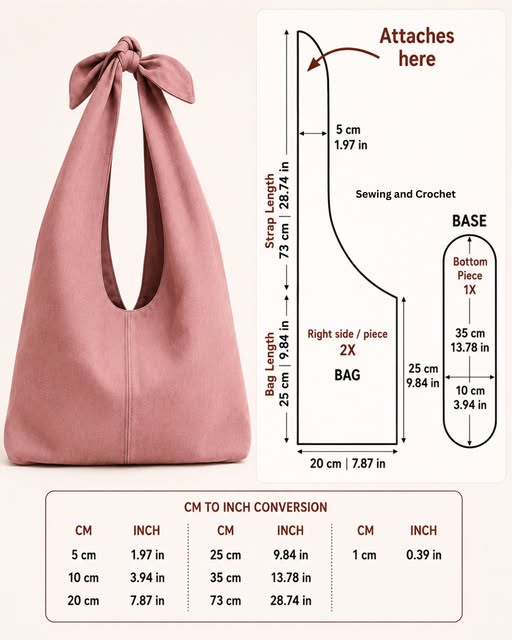
Knot Shoulder Bag Pattern Measurements
The pattern shown in this tutorial uses the following measurements.
Bag Body
Cut 2 bag-body pieces.
The main body is approximately:
20 cm × 25 cm
7.87 in × 9.84 in
Follow the curved shape shown in the pattern rather than cutting a simple rectangle.
Shoulder Strap
Cut:
5 cm × 73 cm
1.97 in × 28.74 in
This creates the long strap used for the knot detail.
Bottom Piece
Cut:
35 cm × 10 cm
13.78 in × 3.94 in
The bottom piece has rounded ends.
Important: Add Seam Allowance
Before cutting your fabric, check whether your pattern already includes seam allowance.
If it does not, add approximately:
1 cm (⅜ inch) around the sewing edges.
This is especially important when attaching the curved bottom to the bag body.
Step 1: Prepare and Cut Your Fabric
Wash and dry your fabric before cutting if it is washable.
This helps prevent the finished bag from shrinking after you make it.
Iron the fabric so you have a smooth surface.
Place your pattern pieces on the fabric and carefully trace them.
Cut:
- 2 bag-body pieces
- 1 bottom piece
- 1 shoulder strap
When cutting the bag body, make sure the two pieces are positioned correctly so they form a matching pair.
Take your time with the curved sections.
Accurate cutting makes sewing much easier.
Step 2: Prepare the Shoulder Strap
Take your long 5 × 73 cm (1.97 × 28.74 in) strip of fabric.
Fold it in half lengthwise with the wrong side facing out.
Press the fold with an iron.
Open the strip.
Now fold both long raw edges toward the center.
Press them again.
Fold the entire strip in half along the original center crease.
The raw edges should now be enclosed inside the strap.
Press the strap again.
Sew along both long edges using a straight stitch.
You now have a long, finished fabric strap.
Set it aside while you work on the bag.
Step 3: Sew the Bag Body
Place the two bag-body pieces together with their right sides facing each other.
Align the edges carefully.
Use sewing clips or pins to hold the pieces together.
Sew along the side edges using a straight stitch.
Remember to backstitch at the beginning and end of each seam.
Do not sew the top opening closed.
The bag needs to remain open so you can finish the edge and attach the strap.
Step 4: Prepare the Bottom Piece
Now take your rounded bottom piece.
The approximate dimensions are:
35 cm × 10 cm (13.78 × 3.94 in).
Find and mark the center of the bottom piece.
Then find the center of the bottom opening of the bag body.
Matching these center points will help you distribute the fabric evenly.
This step is important because you’re attaching a curved piece to the main body of the bag.
Step 5: Attach the Bag Bottom
Turn the bag body so that the right side is facing outward.
Place the bottom piece against the bottom opening.
Match the raw edges.
Start by matching the center points.
Then work your way around the curved edges, securing the fabric with clips or pins.
Don’t worry if the curve feels slightly difficult at first.
Sew slowly.
When you reach a curved section, stop with the needle down, lift the presser foot, adjust the fabric slightly, lower the presser foot, and continue sewing.
This makes it easier to maintain a smooth curve.
After sewing around the entire bottom, inspect the seam.
Make sure there are no gaps.
Step 6: Finish the Top Edge
Now it’s time to finish the opening of the bag.
Fold the raw edge toward the wrong side of the fabric by approximately 1 cm (⅜ inch).
Press it with your iron.
Fold it again if necessary so that the raw edge is completely enclosed.
Press once more.
Sew around the entire top opening with a straight stitch.
Keep the stitching even.
For a cleaner finish, you can use a slightly longer stitch length for the topstitching.
Step 7: Attach the Shoulder Strap
Take the finished shoulder strap.
Position the ends according to the pattern.
The strap should extend upward from both sides of the bag.
Pin or clip the strap securely in place.
Because the strap will support the weight of the bag, this is an area where strong reinforcement is important.
Sew over each strap end several times.
You can also create a small rectangle with an X through it.
This is commonly called a box-X reinforcement and helps distribute the stress across the fabric.
Step 8: Reinforce the Strap
Before finishing the bag, check the connection between the strap and the bag body.
Give it a gentle pull.
If the stitching feels loose, sew over it again.
This is especially important if you plan to carry heavier items.
A pretty bag isn’t very useful if the handle comes off after the first shopping trip!
Step 9: Create the Knot
Now comes the detail that gives this bag its distinctive look.
Bring the long strap sections together above the bag.
Tie them into a simple knot.
Adjust the knot until the two sides are approximately even.
You can make the knot loose for a relaxed look or tighter for a more structured appearance.
The knot also adds a decorative element without requiring a zipper, buckle, or complicated hardware.
Step 10: Give the Bag a Final Press
Your bag is almost finished.
Use an iron to press:
- The side seams
- The bottom seam
- The top opening
- The shoulder strap
- Around the knot
Be careful not to damage your fabric with excessive heat.
Always use the appropriate temperature for your fabric.
A final pressing can make a handmade bag look significantly more polished.
Beginner Sewing Tips
If this is your first sewing project, don’t worry if your first attempt isn’t perfect.
Here are some tips that can make the process easier.
Use Cotton Fabric First
Cotton is one of the easiest fabrics for beginners.
It is stable, easy to cut, and relatively easy to sew.
Use a Fresh Needle
A dull or damaged needle can cause skipped stitches, thread breakage, and uneven sewing.
Use a needle appropriate for the weight of your fabric.
Don’t Sew Too Fast
When you’re learning, controlling the fabric is more important than speed.
Use a slower sewing speed around curves and corners.
Backstitch Your Seams
At the beginning and end of important seams, use the reverse function on your sewing machine.
This helps prevent the stitches from unraveling.
Press as You Sew
Don’t wait until the entire project is finished.
Pressing individual sections throughout the project can make the final result much cleaner.
Can You Make This Bag Without a Sewing Machine?
Technically, yes.
You can sew the entire bag by hand, but it will take considerably longer.
A sewing machine makes the project much faster and produces more consistent seams.
If you’re thinking about buying your first sewing machine, this type of project is a good example of what a basic machine can actually do.
You don’t need hundreds of decorative stitches.
For bags like this, straight stitching, zigzag stitching, adjustable stitch length, and good fabric control are much more important.
What Other Bags Can You Make With a Sewing Machine?
Once you’ve finished this project, you can use the same basic skills to make many other bags.
Try:
1. Simple Tote Bag
A classic rectangular tote is one of the easiest projects for a beginner.
2. Zipper Pouch
This is a great next step if you want to learn how to install zippers.
3. Drawstring Bag
A simple drawstring bag requires relatively little fabric and can be completed quickly.
4. Quilted Tote Bag
Once you’re comfortable sewing straight lines, try adding batting and quilting to a tote.
5. Canvas Shopping Bag
Canvas is stronger and makes an excellent reusable shopping bag.
6. Denim Bag
Old jeans can be transformed into interesting handmade bags.
This is also a fun way to practice sewing heavier fabric.
How Much Fabric Do You Need?
The exact amount depends on the width of your fabric and how you position the pattern pieces.
For this small shoulder bag, you don’t need a huge amount of fabric.
Before purchasing fabric, place your pattern pieces on the fabric width you intend to use.
This will help you estimate your actual fabric requirements and reduce waste.
If you’re using a directional print, remember to check the direction of the design before cutting.
How Long Does It Take to Make This Bag?
For an experienced sewer, this project can be relatively quick.
A beginner may need approximately 1–3 hours, depending on:
- Cutting experience
- Sewing speed
- Fabric type
- Machine familiarity
- Finishing details
Don’t rush.
The goal of a beginner sewing project is not just to finish the bag.
It’s to build skills you can use in future projects.
Is This a Good First Sewing Project?
Yes.
This knot shoulder bag teaches several fundamental sewing techniques without requiring an extremely complicated pattern.
You’ll practice:
Cutting → straight seams → curved seams → attaching a base → making straps → reinforcement → edge finishing.
These skills can be transferred to many other sewing projects.
Final Thoughts
Making your own knot shoulder bag is a simple way to turn a basic piece of fabric into something practical and stylish.
You don’t need an expensive sewing machine or advanced sewing experience.
Start with a stable fabric, take your time with the curved seams, and remember to reinforce the strap attachments.
Once you’ve completed this project, you’ll have more confidence to try larger and more challenging sewing projects.
And that’s one of the best things about sewing:
You don’t just buy something—you learn how to make it yourself.
Frequently Asked Questions
What is the best fabric for a beginner sewing bag?
Cotton is an excellent choice for beginners because it is stable, easy to cut, and relatively easy to sew. Lightweight canvas is another good option if you want a more structured bag.
What sewing machine is best for making bags?
A basic sewing machine with a reliable straight stitch, adjustable stitch length, reverse sewing, and good fabric control is sufficient for many beginner bag projects.
If you plan to sew thick canvas, denim, or multiple layers, consider a machine designed to handle heavier fabrics.
Can a beginner make this knot shoulder bag?
Yes. The project uses basic sewing techniques and is suitable for someone who is learning to sew.
The curved bottom may require a little patience, but sewing slowly makes the process much easier.
Do I need a serger to make this bag?
No. A standard sewing machine is enough.
A serger can be useful for professional-looking seam finishes, but it isn’t necessary for this project.
Can I make this bag with denim?
Yes, but denim is more difficult to sew than lightweight cotton.
If you’re a beginner, start with cotton and move to denim after you’re comfortable controlling your sewing machine.
Can I add a lining to this bag?
Yes.
Adding a lining can make the inside of the bag look cleaner and can also provide additional structure.
However, if this is your first sewing project, you may want to make the unlined version first.
Can I sell handmade bags like this?
You can make handmade bags for personal use or as gifts. If you intend to sell finished products based on a specific commercial pattern, check the pattern designer’s licensing terms first.
More Beginner Sewing Projects
If you enjoyed making this bag, try these next:
- 10 Easy Sewing Projects for Beginners
- How to Make a Simple Tote Bag
- How to Sew a Zipper Pouch
- How to Make a Quilted Bag
- Best Sewing Machines for Beginners
- Best Sewing Machines for Making Bags
- Best Sewing Machines for Heavy Fabric
These projects can help you gradually move from simple sewing techniques to more advanced projects.