
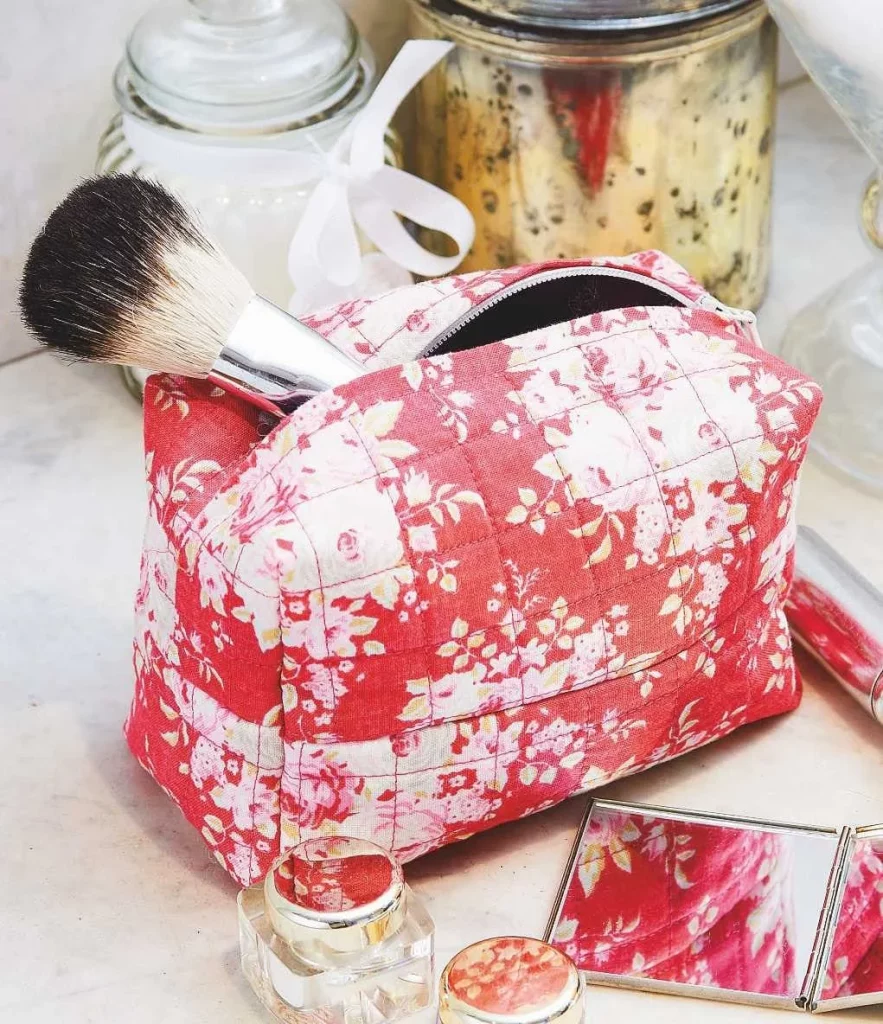
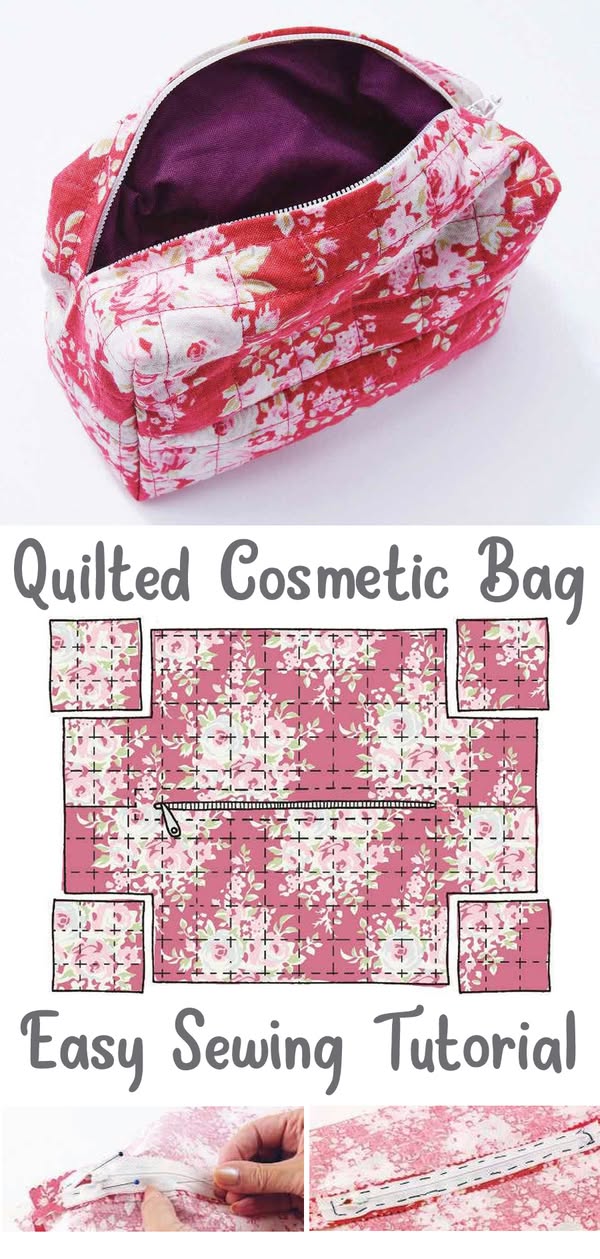
A quilted makeup bag is both a stylish and practical accessory that keeps your cosmetics organized. Whether you’re just beginning your sewing journey or you’re a seasoned quilter looking for a quick project, this tutorial is perfect for you. Using basic quilt patterns, you’ll learn how to turn fabric scraps into a beautiful handmade item.
Quilted bags are ideal for gifting, travel, or everyday use. Their soft, padded construction protects your items and showcases your creativity. With this tutorial, you’ll be using beginner-friendly quilt techniques that are fun and easy to follow.
Let’s dive into a comprehensive, step-by-step guide on how to sew a quilted makeup bag. We’ll walk you through all the fabric cuts, materials, and quilting techniques needed to complete this project confidently.
Materials and Fabric Cuts
Before beginning your quilted makeup bag, gather all the materials. You will need outer fabric, lining fabric, batting, interfacing (optional), a zipper (9 inches), quilting pins, rotary cutter or scissors, and a sewing machine. Choose coordinating quilt fabrics to make your makeup bag truly stand out.
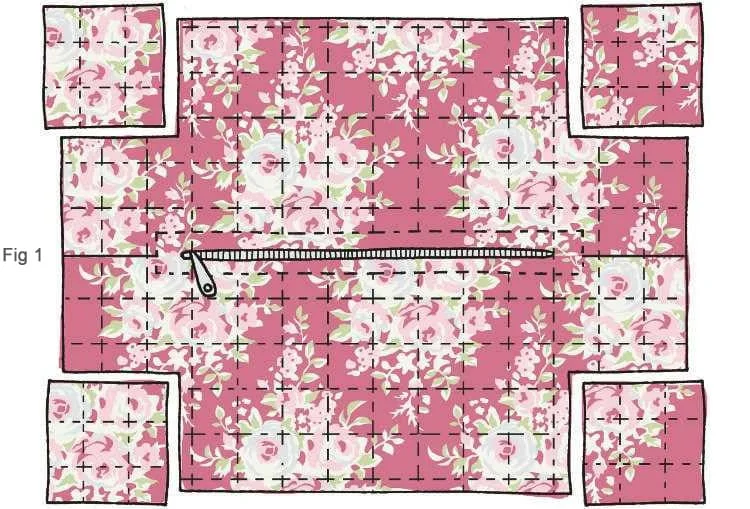
Here are the fabric cuts you will need:
- Outer fabric (main): 2 pieces, 10” x 6”
- Lining fabric: 2 pieces, 10” x 6”
- Batting: 2 pieces, 10” x 6”
- Fabric for zipper ends: 2 pieces, 2” x 2”
The measurements can be adjusted to your preference, but these dimensions create a bag big enough to carry all your essential makeup items. Always pre-wash and press your fabrics before cutting to avoid shrinkage or distortion when you quilt.
Quilting the Outer Fabric
To begin, place one piece of batting behind each outer fabric piece. This is the part where you’ll apply the actual quilting technique. You can choose from various quilt patterns, such as diagonal lines, grids, or even free-motion designs, depending on your skill level and machine capability.
Using a walking foot on your sewing machine, sew straight lines across your outer fabric piece at a 1-inch interval. Repeat this process vertically and horizontally to create a classic grid quilt pattern. This gives your makeup bag a sturdy yet flexible texture.
After quilting both panels, trim any excess batting to match the fabric edges. This step ensures all your layers are flush and ready for the next part. Your quilted fabric pieces should now feel padded and look beautifully textured—just like a mini quilt.
Attaching the Zipper
Now it’s time to attach the zipper. If you’re new to zippers, don’t worry—this method is simple and ideal for beginners. Start by placing a zipper end tab on each side of the zipper, right sides together. Sew across and press flat to keep the zipper length precise.
Next, layer one quilted outer panel right side up, then place the zipper face down along the top edge. Add a lining fabric right side down on top of the zipper. Use clips or pins to hold all layers in place. Sew using a zipper foot for accuracy and repeat for the other side.
Once both sides are sewn, open the fabrics and press them away from the zipper. Topstitch along the edges of the fabric near the zipper for a clean finish. This will prevent the fabric from getting caught in the zipper when you open and close your quilted bag.
Assembling the Bag
With the zipper in place, open it halfway—this is important for turning the bag later. Place the quilted outer pieces right sides together and the lining pieces right sides together. Make sure the seams at the zipper match up nicely.
Sew all the way around the outer and lining edges using a 1/4″ seam allowance, leaving a 3-inch opening at the bottom of the lining for turning. Backstitch at the beginning and end of your stitching to secure the seams. Trim any excess zipper ends and corners for clean edges.
After sewing, turn the bag right side out through the lining. Push out all corners neatly using a blunt tool like a chopstick or the end of a pencil. Once shaped correctly, stitch the lining hole closed and tuck it inside the bag. Your quilted makeup bag is almost done!
Adding the Finishing Touches
Take time to inspect your bag. Make sure all seams are clean and the zipper opens and closes easily. Press the entire bag lightly to give it a polished, professional appearance. You may also add decorative quilt labels or tags if you’re gifting or selling the bag.
If you want to add extra structure, you can use fusible interfacing between the outer fabric and batting in the early steps. This helps the bag stand upright, especially if you’re using soft cotton quilt fabrics. However, even without interfacing, the quilted layers offer a cushioned, structured feel.
Customize your quilted makeup bag with applique, embroidery, or patchwork quilt blocks. This is a great way to practice quilt patterns on a small scale, and every piece you make becomes unique. Personal touches make these bags perfect for birthdays, bridesmaids, or craft fairs.
Tips for Customizing Quilt Patterns
This project is a great opportunity to explore and practice quilt patterns. You can experiment with pieced blocks like log cabin, half-square triangles, or strips sewn together before quilting. These variations turn your simple makeup bag into a work of art.
Using contrasting thread for quilting can also add a stylish accent to your design. Try a bold color that complements your main fabric to make your quilt lines pop. Decorative stitches can enhance the quilted texture and showcase your sewing skills.
Don’t be afraid to repurpose scrap fabrics or even old quilt blocks for this project. It’s a sustainable way to use leftover materials and create something functional. Each makeup bag becomes a showcase of your quilting journey and creative flair.
Why Quilted Makeup Bags Are So Popular
Quilted makeup bags are trending not just for their look but also for their functionality. They protect your cosmetics, are washable, and can be made in various sizes. With the right quilt patterns, even a simple bag can look elegant and store-bought.
They also make thoughtful handmade gifts. Unlike mass-produced accessories, your quilted makeup bag carries a personal touch. Whether you’re giving it as a present or selling it at craft markets, it’s a product that reflects care and creativity.
From beginners to experts, this project suits all skill levels. It allows you to practice quilting on a small scale while creating something practical. With countless quilt patterns to choose from, every bag you make will be uniquely yours.
Conclusion
Sewing a quilted makeup bag is a fun and fulfilling project that lets you combine utility with creativity. It’s a beginner-friendly introduction to quilting and a great way to use up scrap fabric while learning new quilt patterns. With just a few materials and a bit of time, you can create a lovely, functional piece that adds charm to your everyday routine.
Don’t forget to explore different quilt patterns and personalize your bag with colors and textures you love. These bags are perfect for practicing quilting skills, making gifts, or even starting a small handmade business. Every stitch adds value and personality to your creation.
Now that you know how to sew a quilted makeup bag from scratch—with all the fabric cuts and step-by-step instructions—it’s time to get started! Grab your favorite fabrics, fire up your sewing machine, and bring your quilted vision to life.