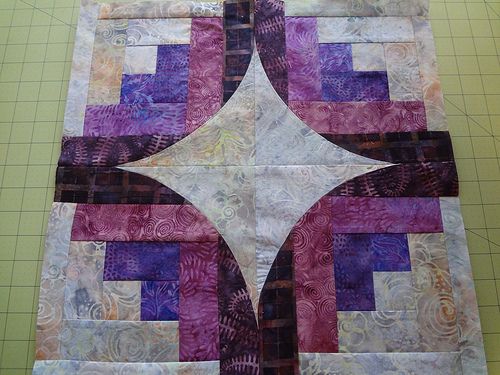
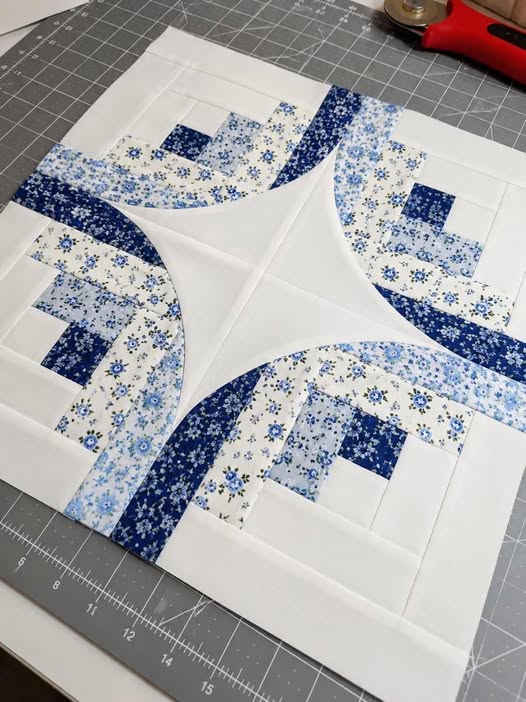
The Log Cabin with Curve Quilt is a beautiful variation of the traditional Log Cabin quilt block. By combining classic straight strips with elegant curved seams, this design creates movement, depth, and a modern artistic appearance.
This project is suitable for confident beginners and intermediate quilters who want to learn curved piecing while creating a stunning quilt that can be used as a bedspread, wall hanging, or decorative throw.
Materials Needed
Fabrics
- 1 yard Light Fabric (background)
- 1 yard Medium Fabric
- 1 yard Dark Fabric
- ½ yard Accent Fabric
- 2 yards Backing Fabric
- ½ yard Binding Fabric
Batting
- Cotton or polyester batting sized to your quilt
Tools
- Rotary cutter
- Cutting mat
- Acrylic quilting ruler
- Fabric scissors
- Sewing machine
- Iron and ironing board
- Curved quilting ruler (optional)
- Fabric marking pencil
- Quilting pins or clips
- Seam ripper
- Safety pins for basting
Finished Size
- Throw Quilt: Approximately 50″ x 60″
- Block Size: Approximately 12″ x 12″
You can easily adjust the size by making additional blocks.
Understanding the Design
The traditional Log Cabin block begins with a center square and builds outward using strips called “logs.”
In this curved version, some sections are gently curved before joining, creating a flowing and dynamic appearance while maintaining the recognizable Log Cabin structure.
Cutting Instructions
Center Square
Cut:
- 1 square measuring 2½” x 2½”
Light Strips
Cut:
- 2 strips measuring 2½” x 6″
- 2 strips measuring 2½” x 9″
Medium Strips
Cut:
- 2 strips measuring 2½” x 12″
- 2 strips measuring 2½” x 15″
Dark Strips
Cut:
- 2 strips measuring 2½” x 18″
- 2 strips measuring 2½” x 21″
Curved Accent Pieces
Cut:
- 4 rectangles measuring 4″ x 8″
Step 1 – Create the Log Cabin Center
Place the center square right side up.
Sew the first light strip to one side of the square using a ¼” seam allowance.
Press the seam open or toward the strip.
Continue adding strips around the center in the traditional Log Cabin order:
- Top
- Side
- Bottom
- Opposite side
Press after each seam.
Step 2 – Build the Log Cabin Block
Keep adding strips around the center.
Work in a clockwise direction.
Each round should increase the block size evenly.
Tips:
- Maintain an accurate ¼” seam allowance.
- Press frequently for a flatter block.
- Trim loose threads as you work.
Step 3 – Create the Curved Sections
The curved accents are what make this quilt unique.
Marking the Curves
Take each 4″ x 8″ rectangle.
Using a fabric marker:
- Draw a gentle arc from one corner to the opposite side.
- Keep curves smooth and consistent.
Cutting
Carefully cut along the marked line.
You should now have matching curved pieces.
Step 4 – Sew Curved Seams
- Fold both curved pieces in half and mark the center.
- Match center points.
- Pin the centers first.
- Match the ends.
- Add additional pins between.
Slowly sew along the curve.
Do not stretch the fabric.
Remove pins as you sew.
Press carefully with steam.
Step 5 – Attach Curved Sections to the Log Cabin Block
Position the curved pieces on opposite corners of the block.
Sew using a ¼” seam allowance.
Press toward the curved section.
Repeat for all remaining curved pieces.
The block should now display both traditional Log Cabin structure and flowing curved elements.
Step 6 – Trim and Square the Block
Using a quilting ruler:
- Trim all sides.
- Square the block to 12½” x 12½”.
Accurate trimming ensures the blocks fit together perfectly.
Step 7 – Make Additional Blocks
Repeat the process until you have enough blocks.
Suggested Quantities
- Baby Quilt: 12 blocks
- Lap Quilt: 20 blocks
- Throw Quilt: 25 blocks
- Twin Quilt: 42 blocks
- Queen Quilt: 72 blocks
Step 8 – Arrange the Layout
Lay the blocks on a large table or design wall.
Rotate blocks to create:
- Waves
- Spirals
- Circular motion
- Secondary curved patterns
Experiment until you find a layout you love.
Step 9 – Sew the Quilt Top
Join blocks into rows.
Press row seams in alternating directions.
Sew rows together.
Check alignment carefully at every intersection.
Press the completed quilt top.
Step 10 – Create the Quilt Sandwich
Layer:
- Backing fabric (wrong side up)
- Batting
- Quilt top (right side up)
Smooth all layers.
Secure with safety pins, basting spray, or hand basting stitches.
Step 11 – Quilting
Recommended quilting designs:
- Echo Quilting
- Free-Motion Swirls
- Straight-Line Quilting
- Crosshatch Quilting
Step 12 – Add the Binding
Cut binding strips 2½” wide.
Join strips end-to-end.
Attach binding to the quilt front.
Fold to the back.
Hand stitch or machine stitch in place.
Care Instructions
- Machine wash on gentle cycle.
- Use cold water.
- Avoid bleach.
- Tumble dry low or air dry.
- Press lightly if needed.
Final Thoughts
The Log Cabin with Curve Quilt combines the timeless beauty of the traditional Log Cabin block with graceful curved piecing techniques. The result is a quilt full of movement, texture, and visual interest. Whether made in soft neutrals, bright modern colors, or classic scrappy fabrics, this project is a wonderful way to expand your quilting skills while creating a truly eye-catching handmade quilt.